> ## Documentation Index
> Fetch the complete documentation index at: https://help.privy.com/llms.txt
> Use this file to discover all available pages before exploring further.
# Use a Namecheap Sending Domain
> Learn how to set up and verify your Namecheap sending domain in your Privy account.
To improve & maintain deliverability and build trust with your email recipients, you should be sending your emails from your brand's custom sending domain in Privy. This resource will walk you through the steps on how to set up your DNS records with Namecheap. If you use a different provider, please see [this resource](/docs/learn/deliverability/use-a-custom-sending-domain).
**Please ensure that you meet the following requirements before proceeding:**
* You must own a domain name — addresses from free providers like Gmail or Yahoo won’t work.
* You must have the ability to update the DNS records of your domain.
* You must be hosting a website at the root of the domain.
## Add the domain
To add a new sending domain:
* Select **Settings** in the lower left corner of your dashboard.
* Under **Email Settings**, select [Sending Domains](https://dashboard.privy.com/settings/sending-domains). \* Click the **+ Add Sending Domain** button in the upper right.
* In the prompt, enter your domain name (e.g., example.com) and click the **Save** button. The provided domain must be a root domain, not a subdomain (e.g., mail.example.com).
## Update your DNS Information
After completing the previous steps, DNS records are generated for your domain. The records are automatically presented to you after saving the domain for the first time. However, if you have navigated away from the page, the records can be easily accessed by returning to your [Sending Domain](https://dashboard.privy.com/settings/sending-domains) settings, locating the domain, and clicking the **DNS Records** button.
Once you've accessed the records:
* Navigate to Namecheap and log into your account.
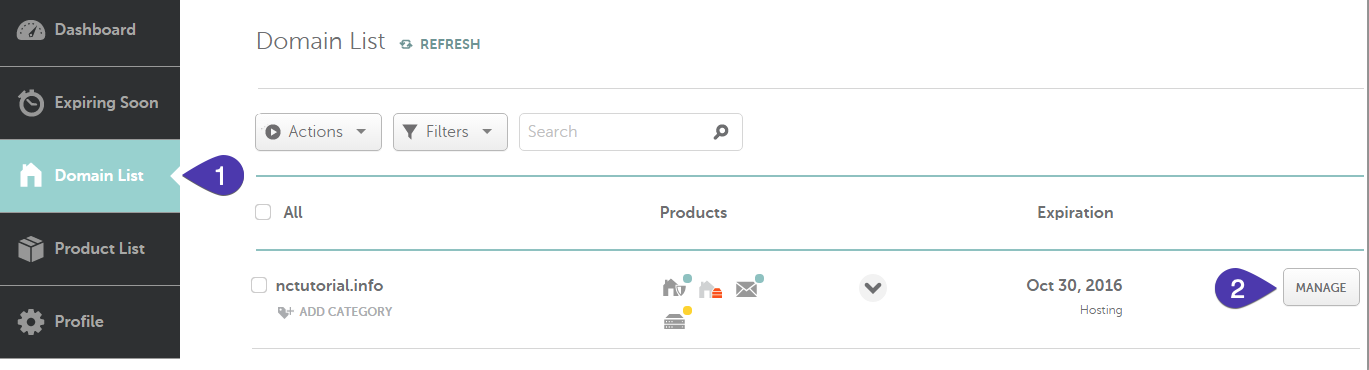
* Select **Domain List** from the sidebar and click the **Manage** button next to your domain.
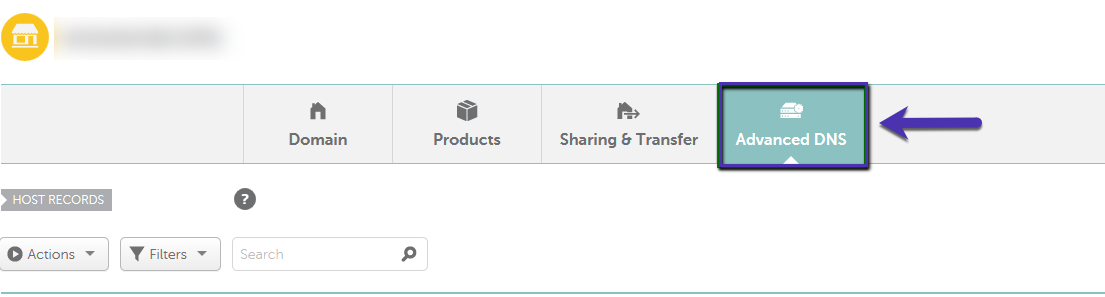
 * Select the **Advanced DNS** tab at the top of the page.
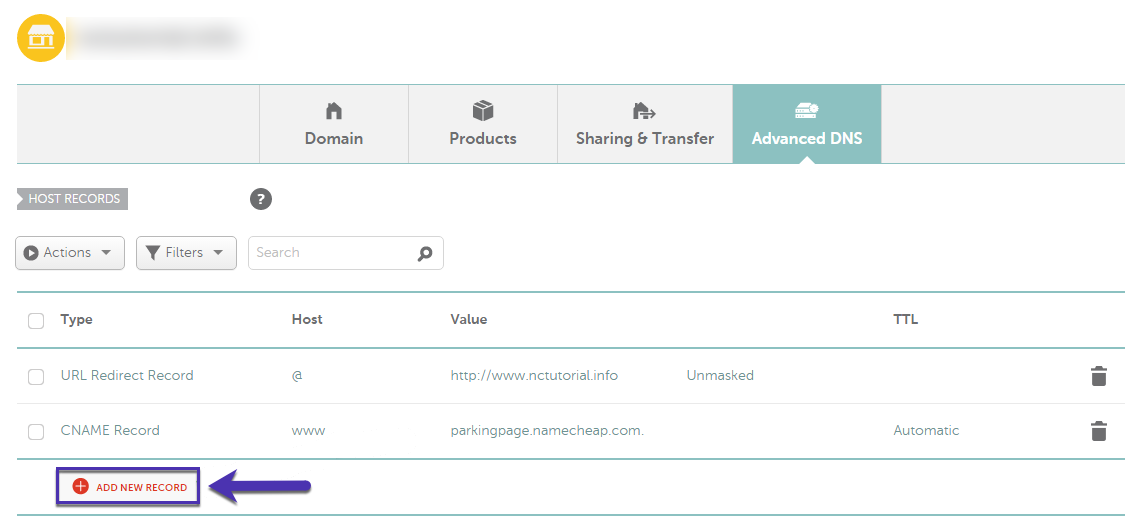
 * Add a new record by clicking the **Add new record** button towards the bottom of the page.
* Add each record displayed in Privy, making sure to match **Type** with **Type**, **Host** with **Host**, and **Data** with **Value**.
* Add a new record by clicking the **Add new record** button towards the bottom of the page.
* Add each record displayed in Privy, making sure to match **Type** with **Type**, **Host** with **Host**, and **Data** with **Value**.
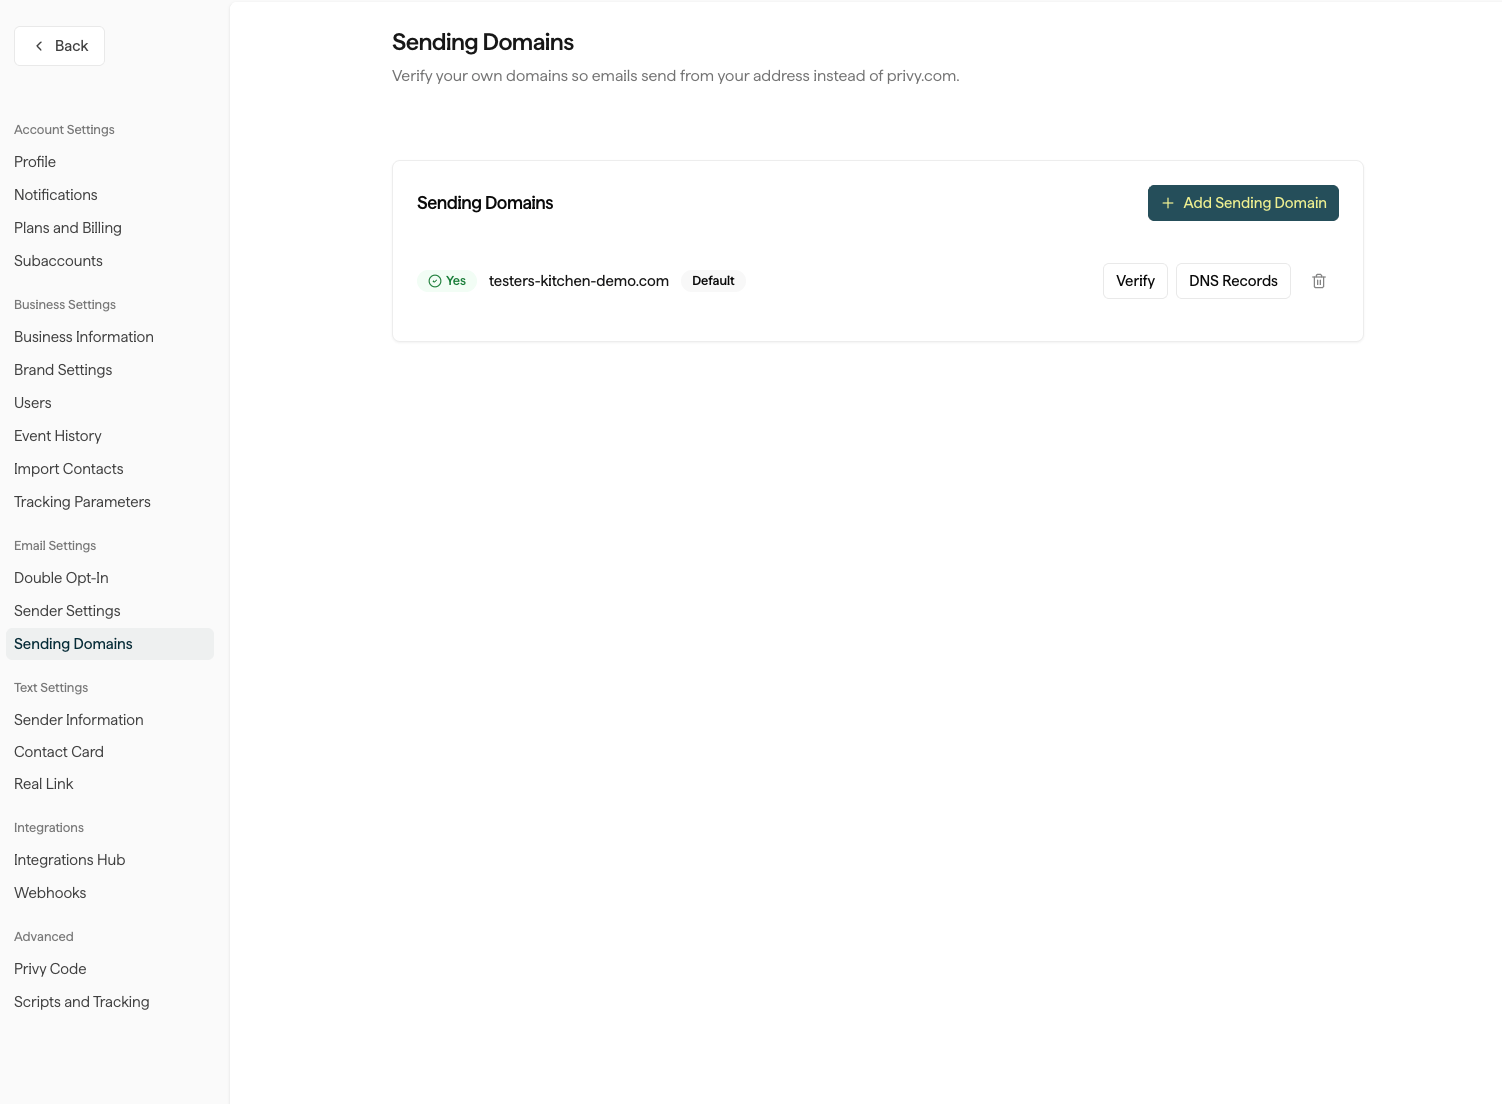
 * Once all of the records are added, return to the records in Privy and click the **Verify and Set Default** button next to the domain. This action will check if the DNS records were updated correctly and set the domain as the default for your emails going forward.
 ## Send emails with your domain
After verifying your sending domain, you can update the default "from" address for emails sent from your account. To update this setting:
* Navigate to **Settings** in the bottom left of your dashboard.
* Navigate to **Sender Options** under the *Email Settings* section.
* Input the desired address before the "@" symbol in the
*Default From Email* field.
* Ensure the desired custom domain appears to the right of the "@" symbol.
* Click the **Save Changes** button to confirm your selections.
Completion of this process will update all emails that you create moving forward.
To update this setting for emails set up before the change:
* Go into the email editor and click on the **From** option under the *Sender Info* section.
* Enter the desired address information and select a verified domain from the dropdown menu.
* Click **Save**.
## Troubleshooting
In most cases, the records should be verified almost immediately when entered into the host correctly. However, some changes will require up to 48 hours to take effect. If your records have not been verified after 48 hours, please do the following:
* Review the "Why haven't my DNS records verified?" guide.
* Attempt the verification process again.
* Contact your web host for assistance.
* Contact our Support Team using the information below.
## Additional Support
If you need help troubleshooting your DNS verification, you can contact our DNS Specialist at [domainservice@privy.com](mailto:domainservice@privy.com) with your questions.
For any inquiries not related to DNS, please contact [support@privy.com](mailto:support@privy.com) or contact us via Live Chat in your dashboard.
## Send emails with your domain
After verifying your sending domain, you can update the default "from" address for emails sent from your account. To update this setting:
* Navigate to **Settings** in the bottom left of your dashboard.
* Navigate to **Sender Options** under the *Email Settings* section.
* Input the desired address before the "@" symbol in the
*Default From Email* field.
* Ensure the desired custom domain appears to the right of the "@" symbol.
* Click the **Save Changes** button to confirm your selections.
Completion of this process will update all emails that you create moving forward.
To update this setting for emails set up before the change:
* Go into the email editor and click on the **From** option under the *Sender Info* section.
* Enter the desired address information and select a verified domain from the dropdown menu.
* Click **Save**.
## Troubleshooting
In most cases, the records should be verified almost immediately when entered into the host correctly. However, some changes will require up to 48 hours to take effect. If your records have not been verified after 48 hours, please do the following:
* Review the "Why haven't my DNS records verified?" guide.
* Attempt the verification process again.
* Contact your web host for assistance.
* Contact our Support Team using the information below.
## Additional Support
If you need help troubleshooting your DNS verification, you can contact our DNS Specialist at [domainservice@privy.com](mailto:domainservice@privy.com) with your questions.
For any inquiries not related to DNS, please contact [support@privy.com](mailto:support@privy.com) or contact us via Live Chat in your dashboard.