> ## Documentation Index
> Fetch the complete documentation index at: https://help.privy.com/llms.txt
> Use this file to discover all available pages before exploring further.
# Create A Display
> Start collecting email and SMS contacts with Privy Convert.
The best way to start growing your list is with a Welcome Display, which incentivizes new visitors to sign up shortly after they arrive to your site. The following guide will walk you through how to create a Welcome Display in Privy so that you can start driving revenue right away.
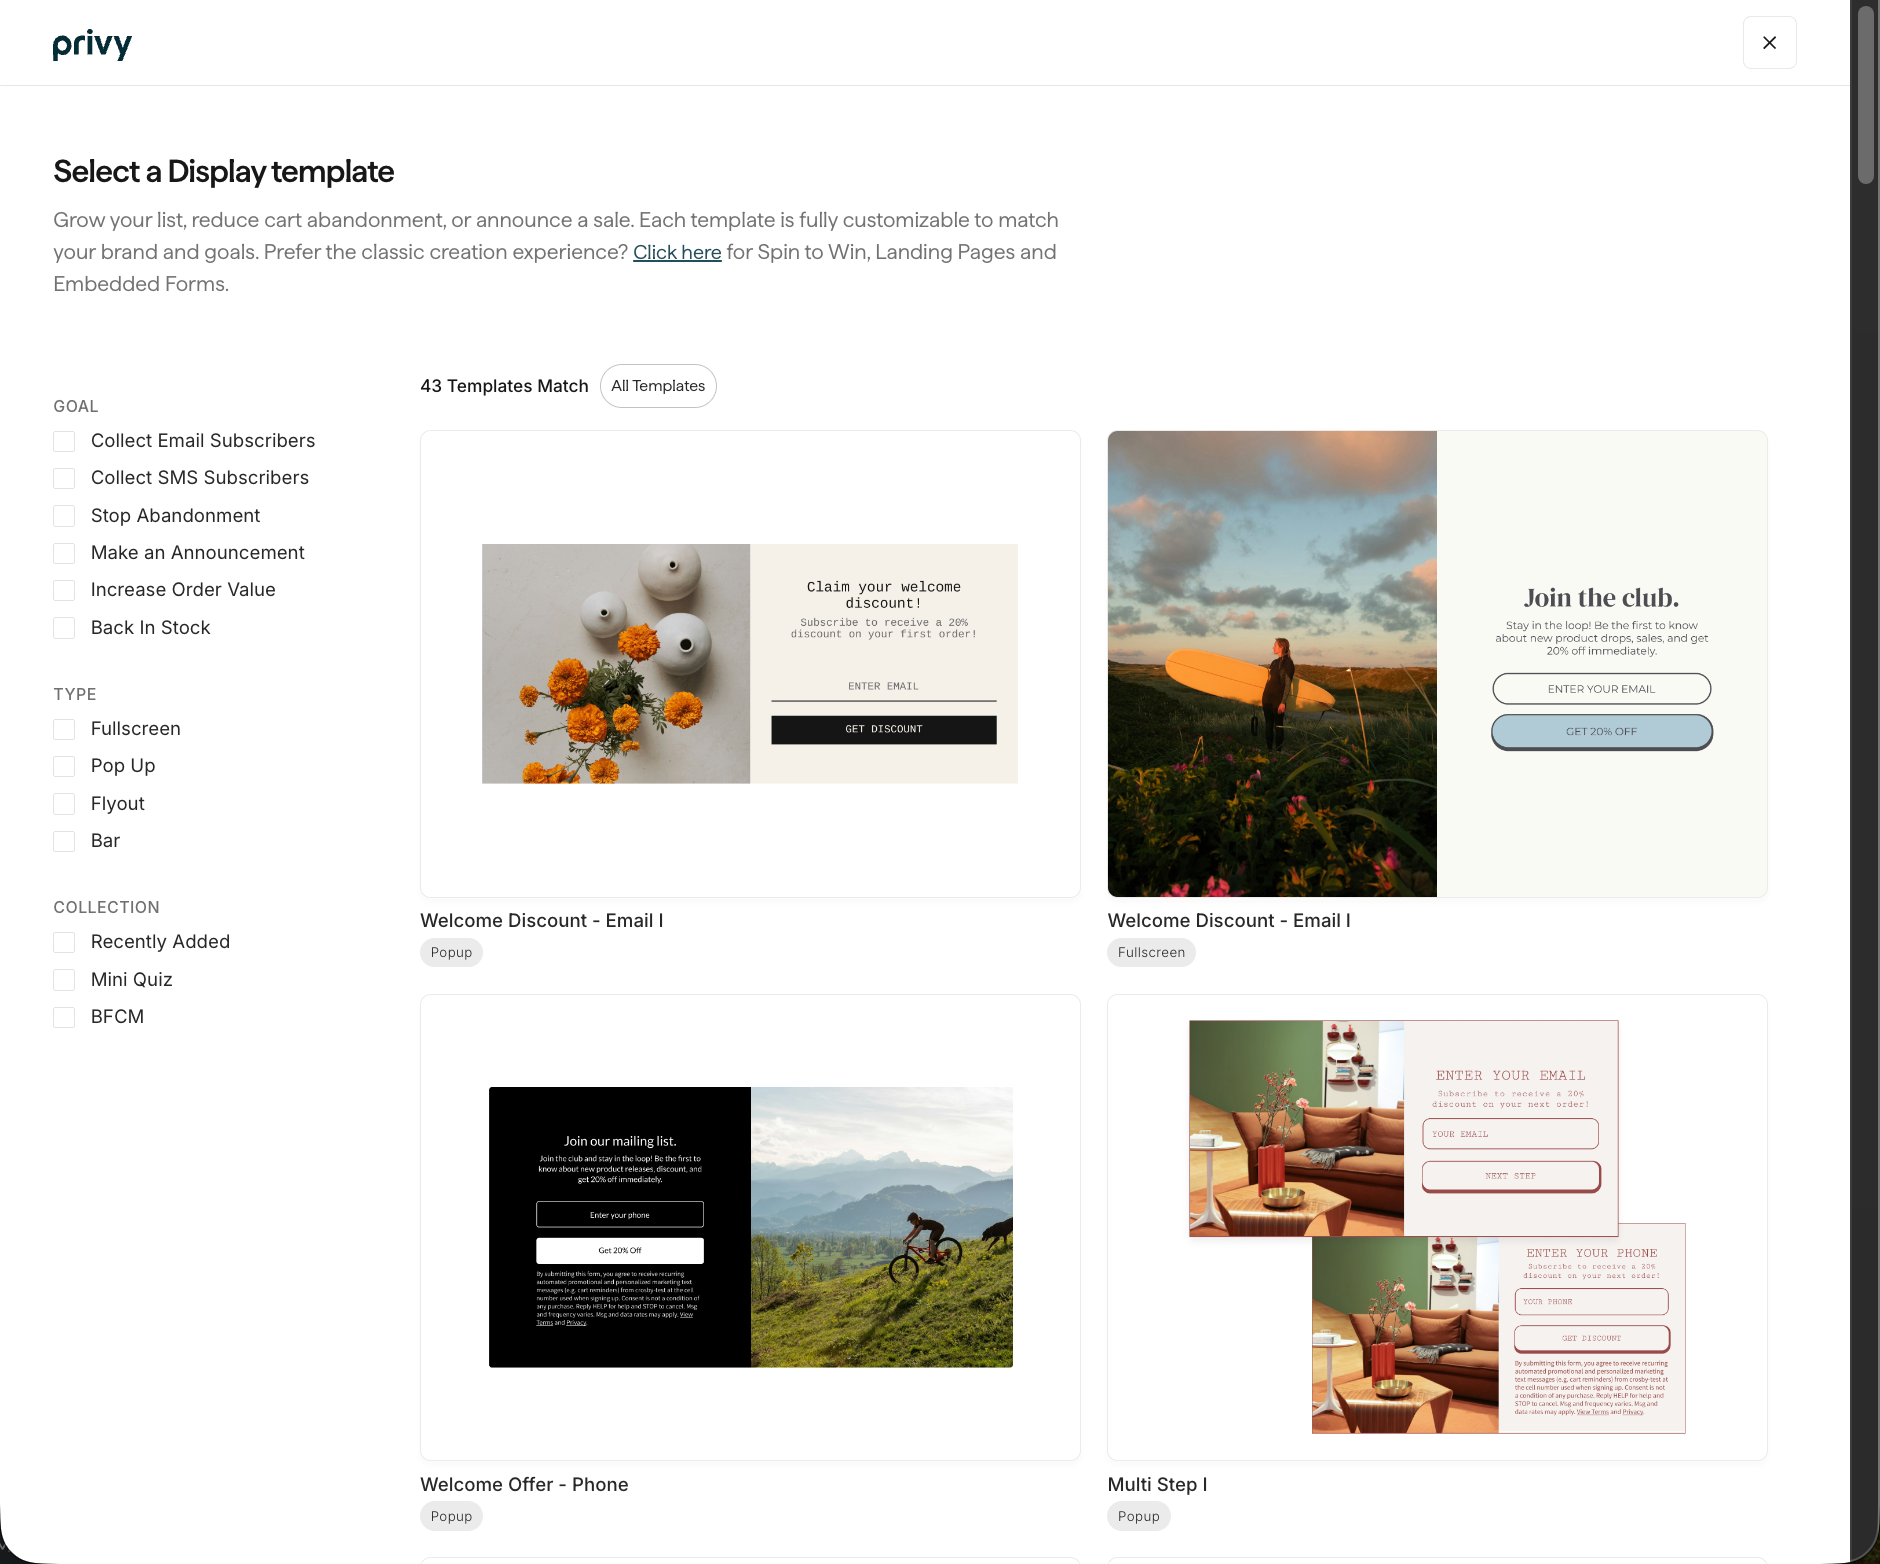
## Choose a Template
To get started:
* Navigate to [Displays](https://dashboard.privy.com/displays) and click **New display**.
* Select which Template you'd like to start with and click **Get started** to open the display editor.
 ## Create your display
Once you've chosen your Template, it's time to make it look and feel like your brand. Under the **Create** step, you can customize your display's appearance and add new steps + elements.
### Display Types
You can easily switch between a Popup, Flyout, Fullscreen, or Bar using the "Display Type" options on the right side of your screen.
For help creating display types such as [Spin To Win](https://help.privy.com/docs/learn/displays/classic-designer/spin-to-win), [Landing Pages](https://help.privy.com/docs/learn/displays/classic-designer/landing-page), and [Embedded Forms](https://help.privy.com/docs/learn/displays/classic-designer/embedded-form), please reference their dedicated resources.
### Customize your display's appearance
Change your display's layout, background color, size, padding, and more by using the controls on the right side of your screen.
Make sure you customize each step of your display! Jump between your display's Steps, Thank You Page, and Tab on the bar at the bottom of the editor. You can also toggle between desktop and mobile preview here.
As you edit your display, use the **Match Styles** tool to copy size, layout, font styles, and colors between your steps.
### Add new elements
To add new form fields (i.e., Name or Phone Number) or to add new elements (i.e., an image or text box) click on the blue plus sign which appears as you hover over your display.
To rearrange elements, drag and drop them as shown below.
### Edit existing elements
To edit an existing form field or element, click directly on it and manage its appearance and settings using the controls on the right side of your screen.
### Add and delete steps
To add a new step to your display, click the **Add Step** button at the bottom of the editor. You'll be prompted to specify what information you'd like to collect on this new step.
You can drag and drop your steps to reorder them, if necessary. To delete or duplicate a step, click on the 3 dots beside it.
### Manage your Tab
A tab is a great way for your audience to manually trigger your display if they haven't already signed up. To manage your tab's appearance and visibility, click on Tab at the bottom of your screen.
Choose which devices you'd like your display visible on, as well as its position, on the right side of the screen. To edit the text + font, click directly on your tab in the editor!
## Target the right audience
When you're happy with your display's design, you'll want to head over to **Settings** to make sure it's showing to the right people at the right time. Privy will have our default best practices in place, but you're more than welcome to tweak them to fit your business' needs.
## Create your display
Once you've chosen your Template, it's time to make it look and feel like your brand. Under the **Create** step, you can customize your display's appearance and add new steps + elements.
### Display Types
You can easily switch between a Popup, Flyout, Fullscreen, or Bar using the "Display Type" options on the right side of your screen.
For help creating display types such as [Spin To Win](https://help.privy.com/docs/learn/displays/classic-designer/spin-to-win), [Landing Pages](https://help.privy.com/docs/learn/displays/classic-designer/landing-page), and [Embedded Forms](https://help.privy.com/docs/learn/displays/classic-designer/embedded-form), please reference their dedicated resources.
### Customize your display's appearance
Change your display's layout, background color, size, padding, and more by using the controls on the right side of your screen.
Make sure you customize each step of your display! Jump between your display's Steps, Thank You Page, and Tab on the bar at the bottom of the editor. You can also toggle between desktop and mobile preview here.
As you edit your display, use the **Match Styles** tool to copy size, layout, font styles, and colors between your steps.
### Add new elements
To add new form fields (i.e., Name or Phone Number) or to add new elements (i.e., an image or text box) click on the blue plus sign which appears as you hover over your display.
To rearrange elements, drag and drop them as shown below.
### Edit existing elements
To edit an existing form field or element, click directly on it and manage its appearance and settings using the controls on the right side of your screen.
### Add and delete steps
To add a new step to your display, click the **Add Step** button at the bottom of the editor. You'll be prompted to specify what information you'd like to collect on this new step.
You can drag and drop your steps to reorder them, if necessary. To delete or duplicate a step, click on the 3 dots beside it.
### Manage your Tab
A tab is a great way for your audience to manually trigger your display if they haven't already signed up. To manage your tab's appearance and visibility, click on Tab at the bottom of your screen.
Choose which devices you'd like your display visible on, as well as its position, on the right side of the screen. To edit the text + font, click directly on your tab in the editor!
## Target the right audience
When you're happy with your display's design, you'll want to head over to **Settings** to make sure it's showing to the right people at the right time. Privy will have our default best practices in place, but you're more than welcome to tweak them to fit your business' needs.
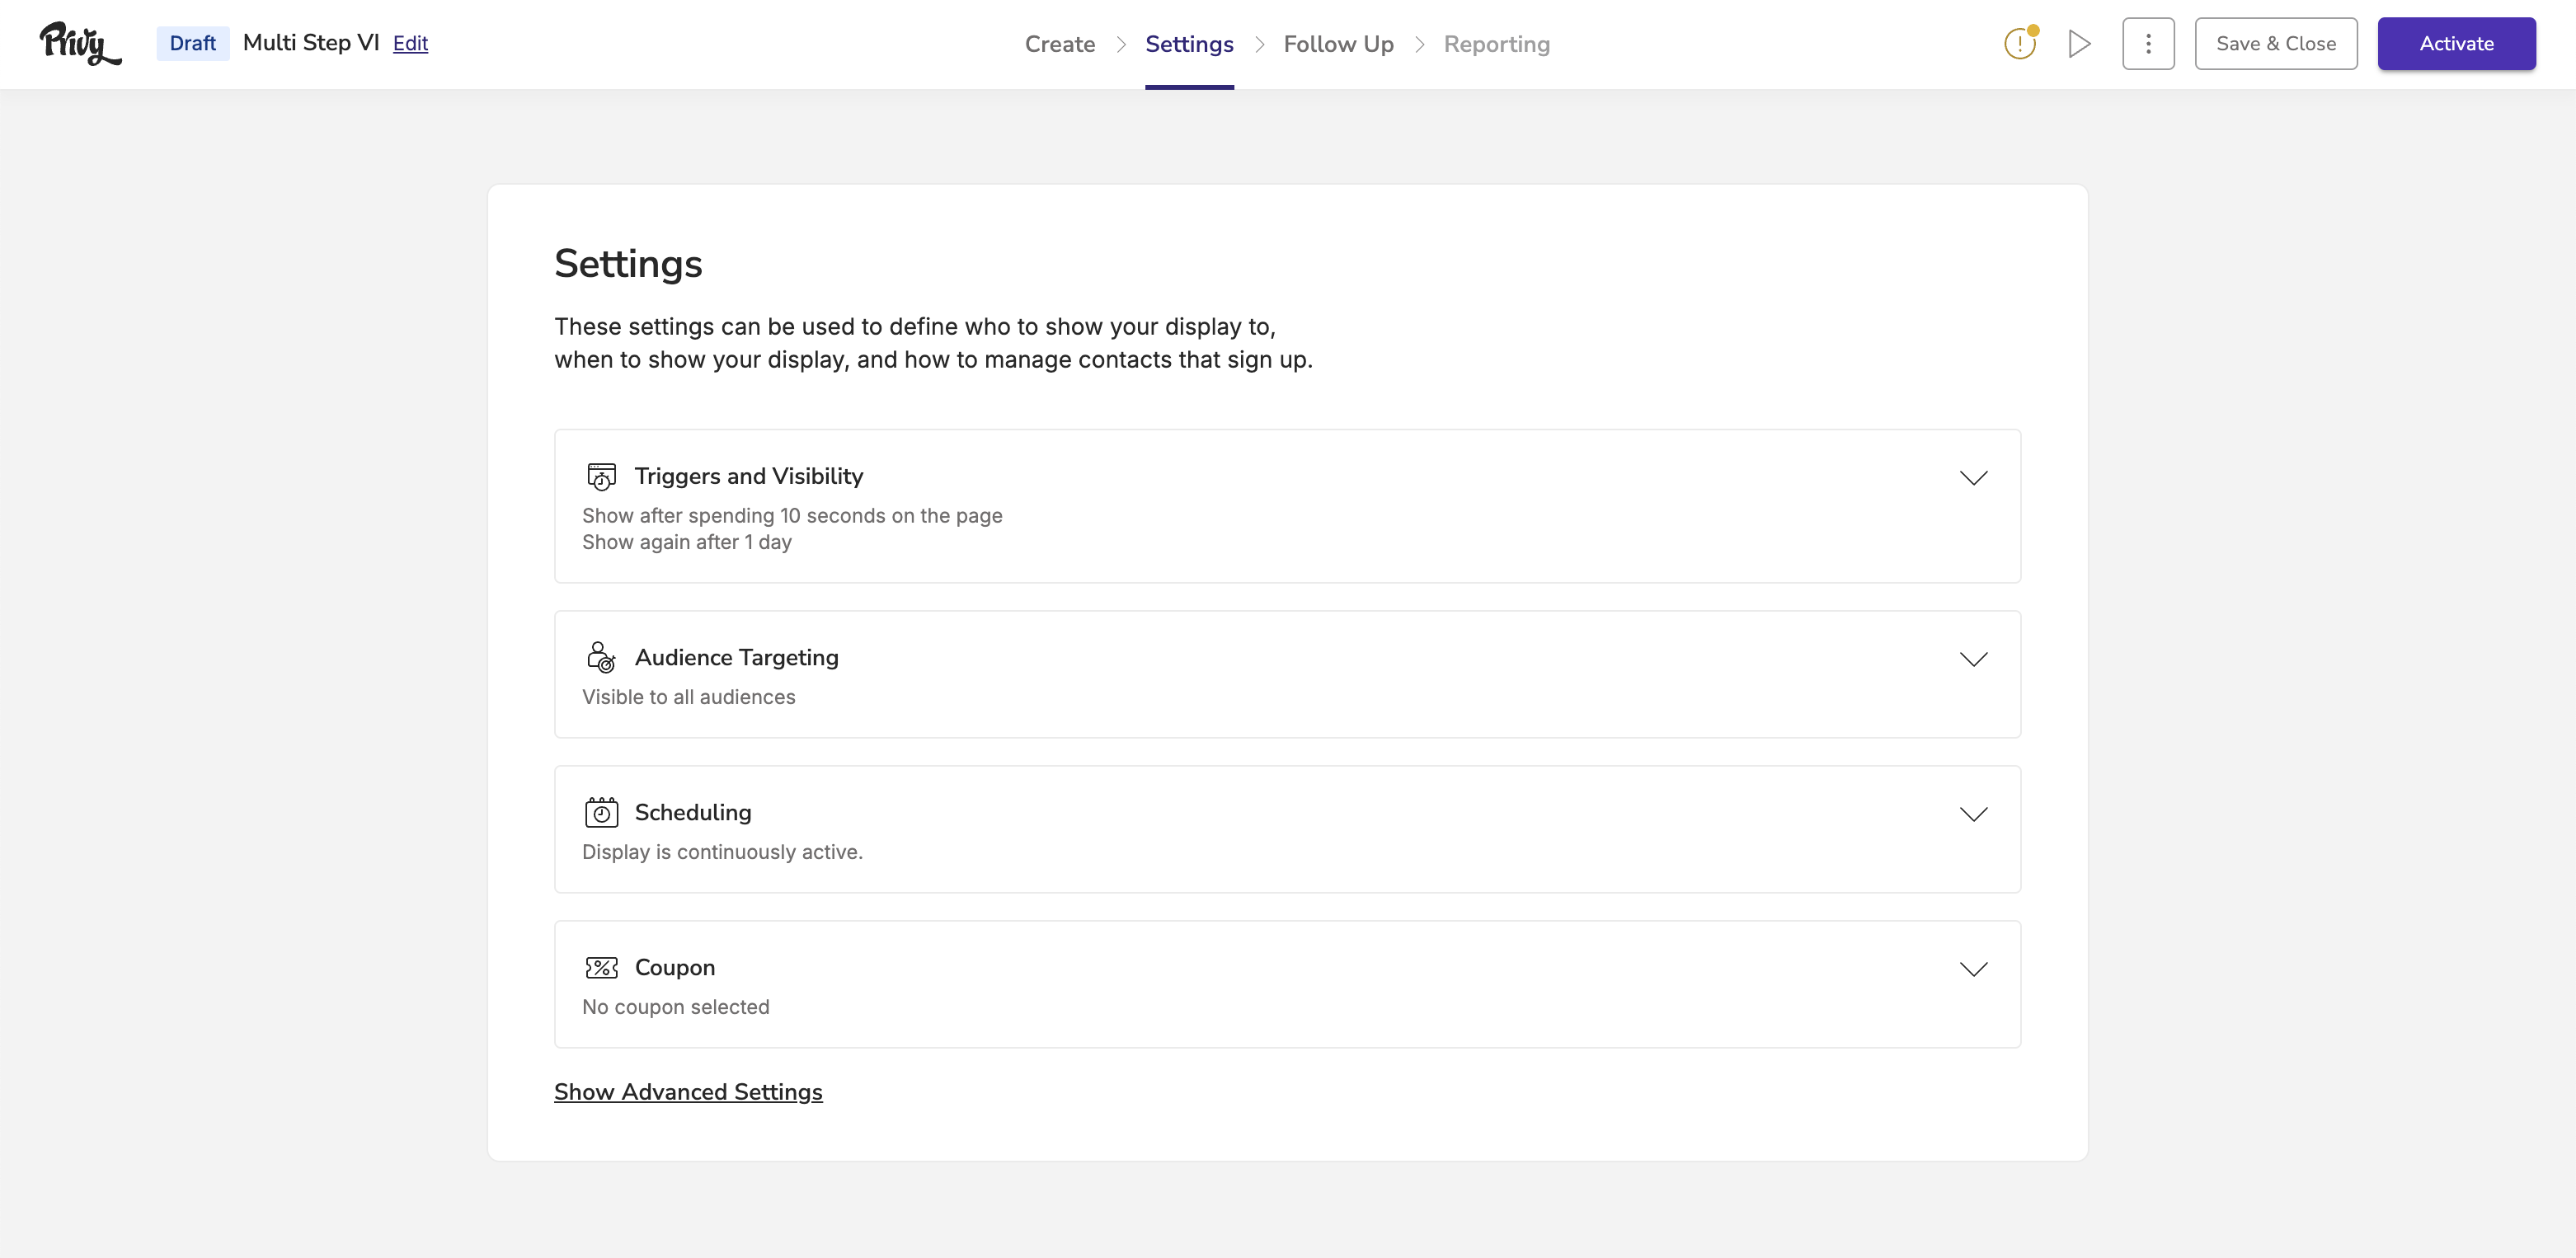 ### Basic Settings
* **Triggers and Visibility** determines when and how the display appears for the visitor.
* **Audience Targeting** allows you to specify what visitors will be able to see the display.
* **Scheduling** determines how long the display will run for.
* The **Coupon** setting allows you to attach a coupon code that you would like to deliver to new sign-ups. [Learn more about Coupon Codes.](https://help.privy.com/docs/learn/content/coupon-codes)
### Advanced Settings
Our Advanced Settings allow you to have even more control over your display's behavior:
* **Sign Up Rules** control how often a contact can sign up for your display. *By default, this is set to limit 1 signup per contact.*
* The **Email Opt-In** setting allows you to choose between our Single Opt-In and Double Opt-In methods for email sign ups. *By default, this is set to Single Opt-In.* [Learn more about Email Opt-In Methods.](https://help.privy.com/docs/learn/contact-management/email-opt-in)
* The **SMS Opt-In** setting (shown when your display collects a phone number) lets you choose between Single Opt-In and Double Opt-In for SMS sign ups. *By default, this is set to Double Opt-In.* [Learn more about SMS Opt-In Methods.](https://help.privy.com/docs/learn/contact-management/sms-opt-in)
* Use the **Sync Integrations** setting to automatically sync your sign ups to your preferred ESP.
* **Profile Attributes** allows you to automatically collect data from new sign ups, without needing them to fill out a form field. Learn more.
[Learn more about Privy's Settings and Audience Targeting.](https://help.privy.com/docs/learn/displays/settings-overview)
## Set up After Sign Up Emails and Texts
In the **Follow-Up** step, you will have the optional (but recommended) actions of creating and publishing [Welcome Flow emails and texts](https://help.privy.com/docs/learn/flows/welcome). This is a great way to confirm your new contact's sign up and deliver their coupon code.
## Launch your display
Once you've created your display, customized your settings, and reviewed your follow-up actions, it's time to make it live on your site. Click **Activate** and get ready to start seeing results!
You can still make changes to your display's appearance, settings, or follow-up actions once it is published by clicking **Update Live Display** in the editor.
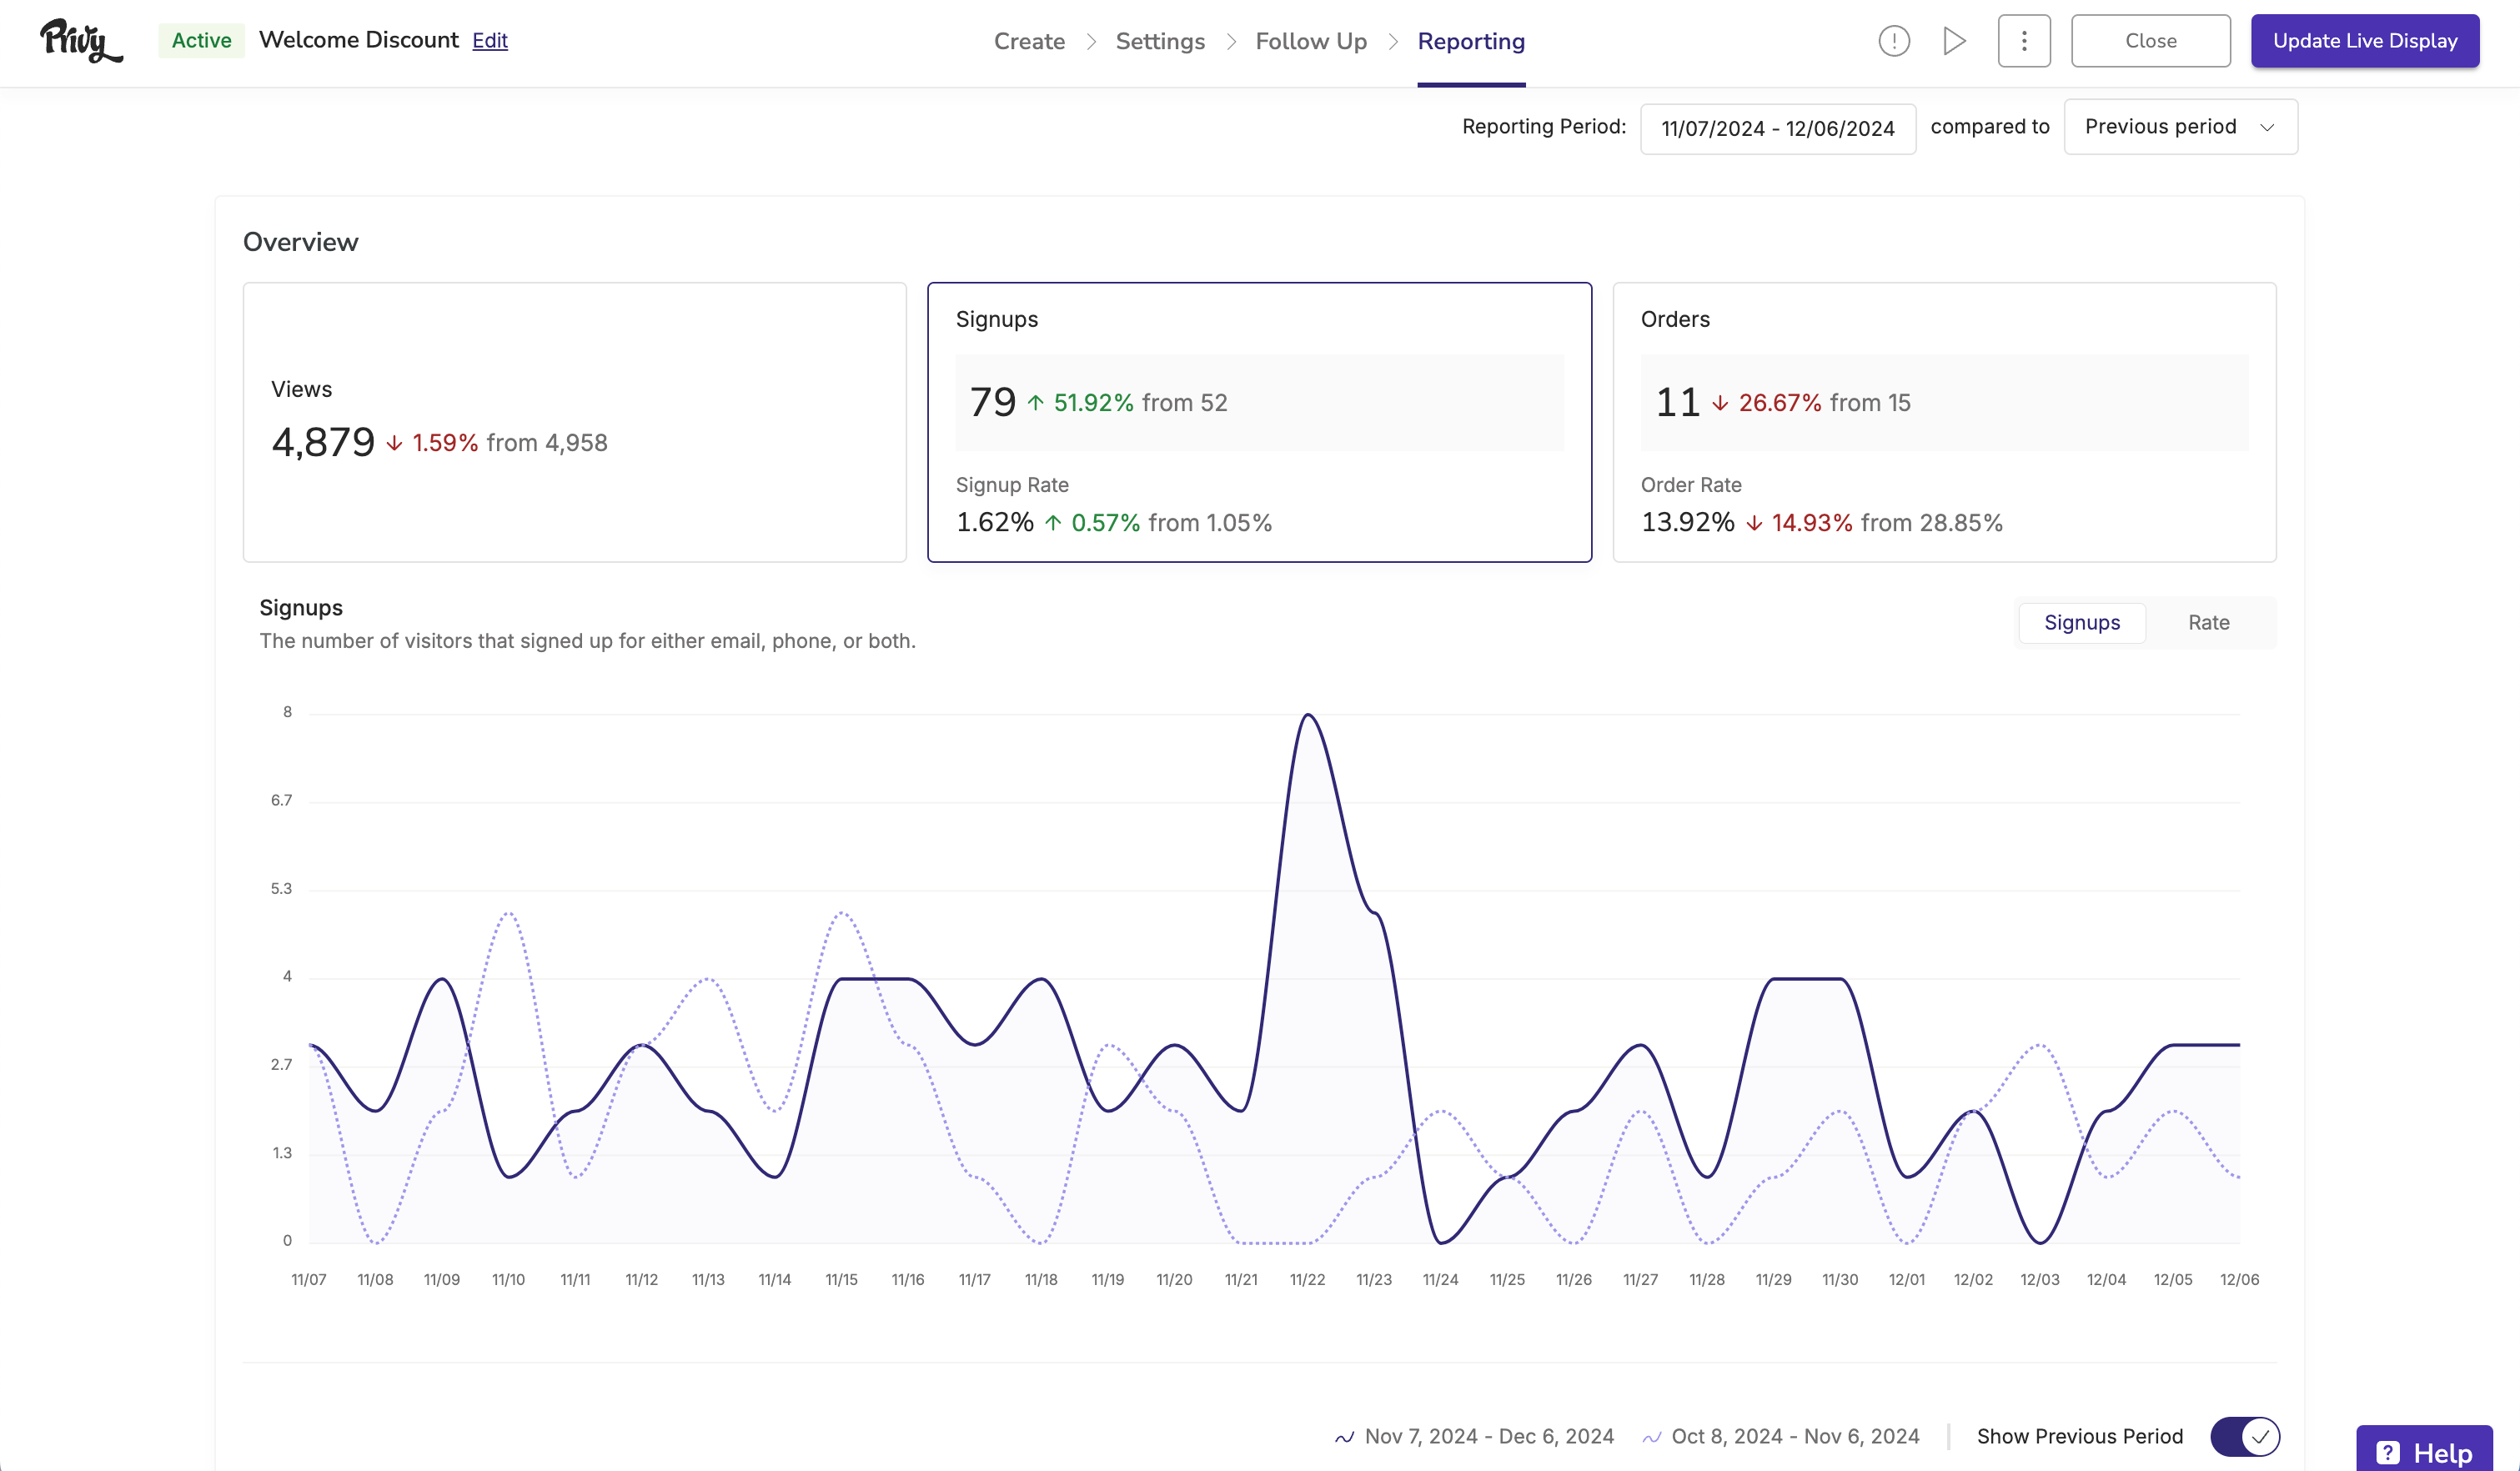
### Reporting
After you activate your display, you can review its performance at any time in the **Reporting** tab. [Learn more about Privy Convert Reporting.](https://help.privy.com/docs/learn/displays/reporting-overview)
### Basic Settings
* **Triggers and Visibility** determines when and how the display appears for the visitor.
* **Audience Targeting** allows you to specify what visitors will be able to see the display.
* **Scheduling** determines how long the display will run for.
* The **Coupon** setting allows you to attach a coupon code that you would like to deliver to new sign-ups. [Learn more about Coupon Codes.](https://help.privy.com/docs/learn/content/coupon-codes)
### Advanced Settings
Our Advanced Settings allow you to have even more control over your display's behavior:
* **Sign Up Rules** control how often a contact can sign up for your display. *By default, this is set to limit 1 signup per contact.*
* The **Email Opt-In** setting allows you to choose between our Single Opt-In and Double Opt-In methods for email sign ups. *By default, this is set to Single Opt-In.* [Learn more about Email Opt-In Methods.](https://help.privy.com/docs/learn/contact-management/email-opt-in)
* The **SMS Opt-In** setting (shown when your display collects a phone number) lets you choose between Single Opt-In and Double Opt-In for SMS sign ups. *By default, this is set to Double Opt-In.* [Learn more about SMS Opt-In Methods.](https://help.privy.com/docs/learn/contact-management/sms-opt-in)
* Use the **Sync Integrations** setting to automatically sync your sign ups to your preferred ESP.
* **Profile Attributes** allows you to automatically collect data from new sign ups, without needing them to fill out a form field. Learn more.
[Learn more about Privy's Settings and Audience Targeting.](https://help.privy.com/docs/learn/displays/settings-overview)
## Set up After Sign Up Emails and Texts
In the **Follow-Up** step, you will have the optional (but recommended) actions of creating and publishing [Welcome Flow emails and texts](https://help.privy.com/docs/learn/flows/welcome). This is a great way to confirm your new contact's sign up and deliver their coupon code.
## Launch your display
Once you've created your display, customized your settings, and reviewed your follow-up actions, it's time to make it live on your site. Click **Activate** and get ready to start seeing results!
You can still make changes to your display's appearance, settings, or follow-up actions once it is published by clicking **Update Live Display** in the editor.
### Reporting
After you activate your display, you can review its performance at any time in the **Reporting** tab. [Learn more about Privy Convert Reporting.](https://help.privy.com/docs/learn/displays/reporting-overview)
 ## Pause a display
If you need to stop a display from showing to visitors on your site, you can pause it at any time without deleting it.
1. Navigate to [Displays](https://dashboard.privy.com/displays) in your Privy dashboard.
2. Locate the display you want to pause.
3. Click the ellipsis (**...**) button on the display.
4. Click **Pause**. A confirmation pop-up will appear — click **Pause** again to confirm.
Once paused, the display will no longer appear to visitors on your site. To reactivate it, follow the same steps and click **Launch** instead of Pause.
## Pause a display
If you need to stop a display from showing to visitors on your site, you can pause it at any time without deleting it.
1. Navigate to [Displays](https://dashboard.privy.com/displays) in your Privy dashboard.
2. Locate the display you want to pause.
3. Click the ellipsis (**...**) button on the display.
4. Click **Pause**. A confirmation pop-up will appear — click **Pause** again to confirm.
Once paused, the display will no longer appear to visitors on your site. To reactivate it, follow the same steps and click **Launch** instead of Pause.