> ## Documentation Index
> Fetch the complete documentation index at: https://help.privy.com/llms.txt
> Use this file to discover all available pages before exploring further.
# Audience Targeting + Settings
> Customize how your displays appear to your preferred audience.
Privy Convert has a wide range of settings so that you can customize when + how your displays trigger, to whom, and how your information is collected. In this article, we'll review where to find your settings, and break down what each condition means.
## Where can I find my displays' settings?
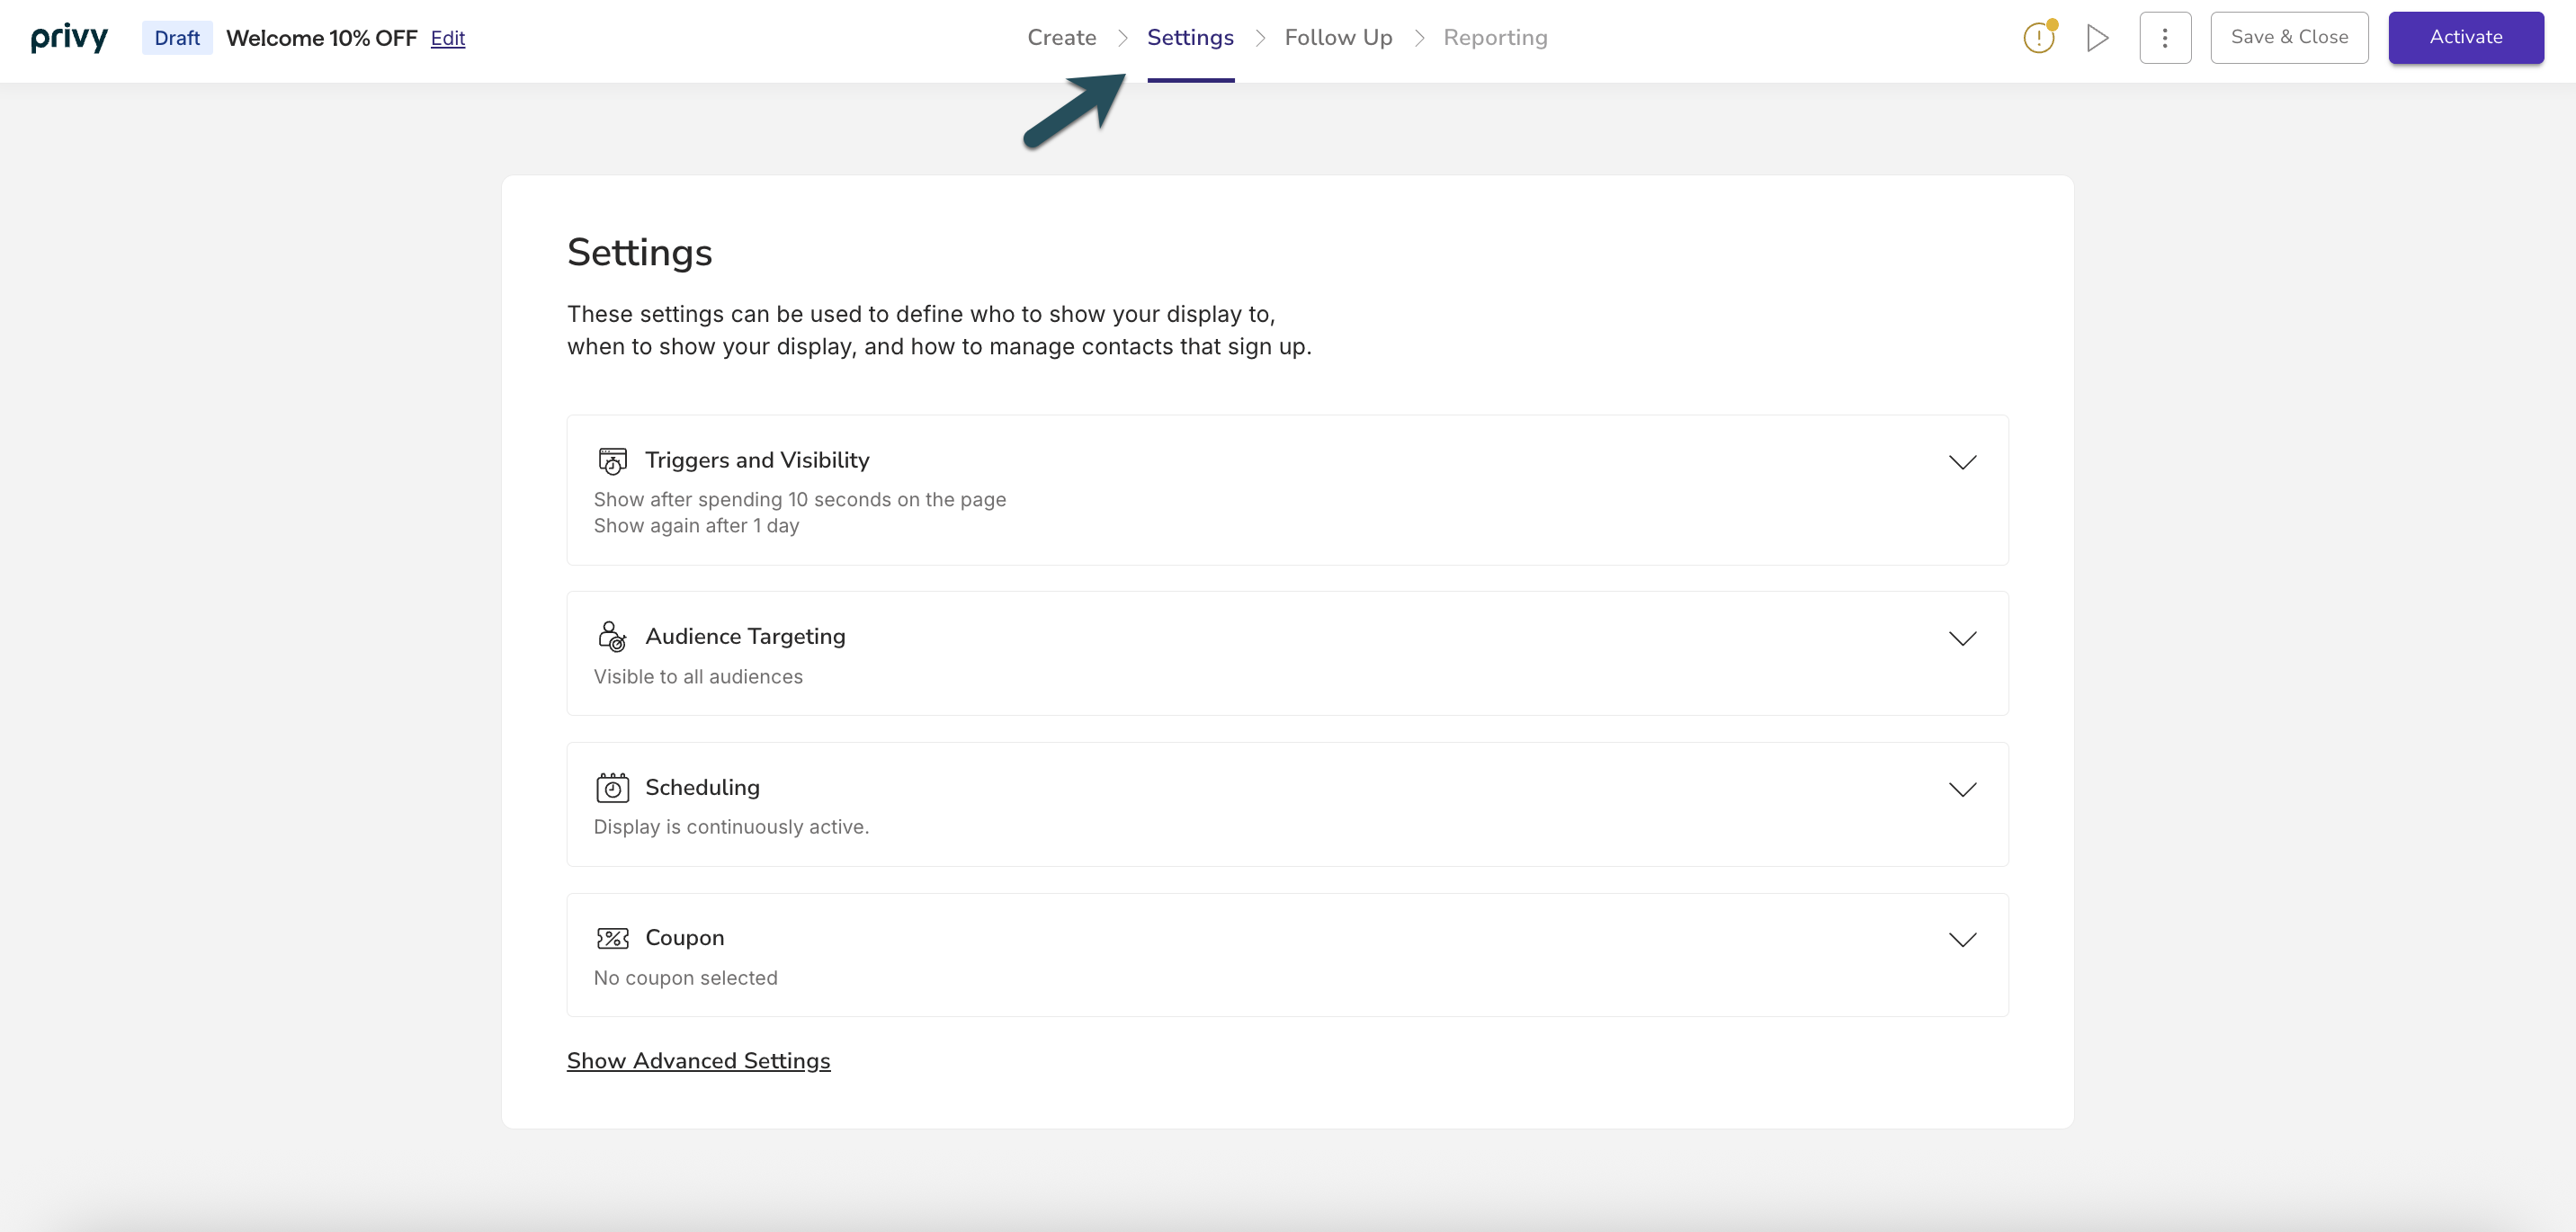
Head to [Displays](https://dashboard.privy.com/displays). Select an existing display or create a new one. Head to the **Settings** step at the top of the editor.
 ## Basic Settings
### Triggers and Visibility
Determine how and when your display appears to your audience.
## Basic Settings
### Triggers and Visibility
Determine how and when your display appears to your audience.
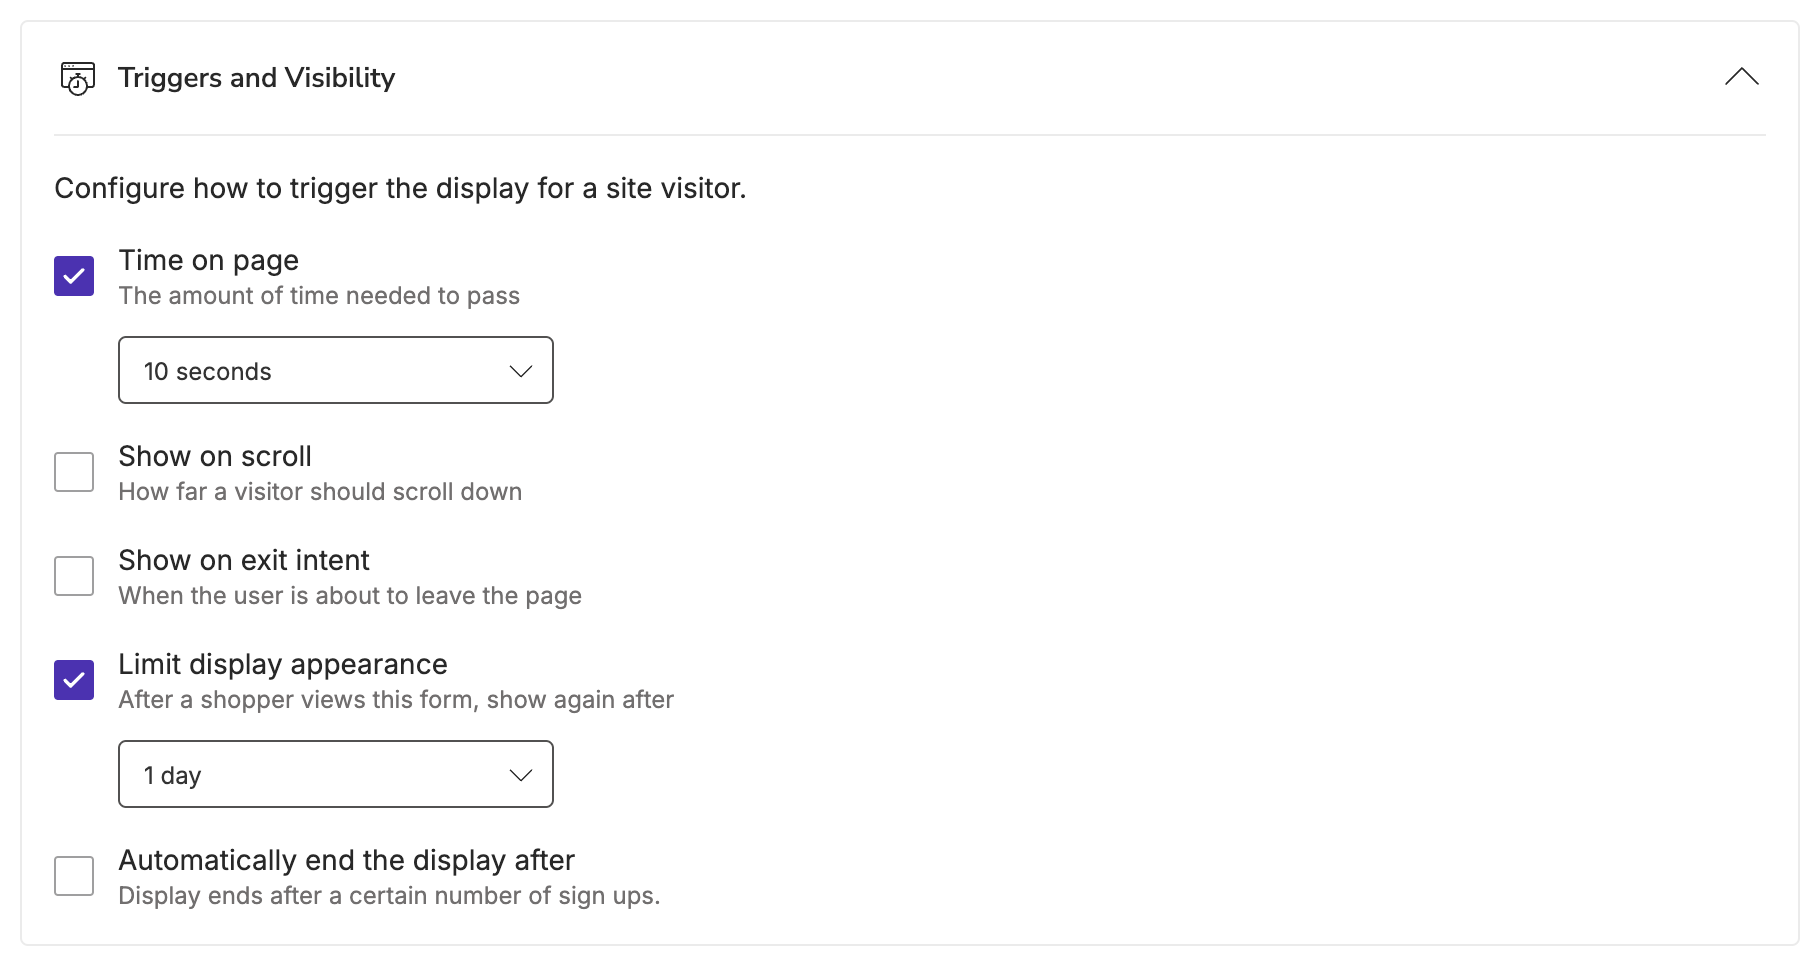 You have the option to choose one or more of the following **trigger** settings:
* Time on Page
* Show on scroll
* Show on exit intent
If you have more than one trigger setting selected, then whichever event happens first will cause the display to appear.
If you have no trigger settings selected, your display will not appear automatically for your audience. In this case, we recommend using a tab so visitors can manually trigger your display.
You have the option to choose one or more of the following **visibility** settings:
* Limit display appearance
* Automatically end the display after X signups
Limiting the display appearance will prevent the display from triggering again for a visitor until the specified time has passed. *Our default is always set to 1 day.*
Unchecking "Limit display appearance" means there will be **no limit** to how often a display will trigger in a session for your audience.
### Audience Targeting
Privy allows you to target displays by Customer Attributes, Shopping Activity, Website Behavior, and more. You can explore all available properties in depth below:
* **Country:** Target visitors based on the country reported by the visitor's IP address.
* **Custom Fields:** Target known contacts based on their Custom Field values, which can be provided via an import or by signing up for a display. Learn more about Custom Fields.
* **Language:** Target visitors based on the default language set in their browser. The values for this condition are language codes following the [BCP 47](https://www.techonthenet.com/js/language_tags.php) standard and written without the region subtag —for example, en for English, fr for French, or es for Spanish.
* **Postal Code:** Target visitors based on the postal code detected from their IP address. Enter each exact postal code on its own line, without country prefixes. For country-specific targeting, such as Norway, add a separate **Country** condition.
* **Region:** Target contacts based on their geographic region. This condition currently supports states from the United States, counties from the United Kingdom, provinces from Canada, and states/territories from Australia.
* **Cart Product IDs:** Target visitors based on whether or not specific Product ID(s) have been identified in their cart. *Available for accounts integrated with Shopify or BigCommerce.* *For BigCommerce stores, Privy does not sync the product catalog, so you'll need to enter the numeric Product ID manually.*
* **Cart Value:** Target visitors based on the current value in their cart. *Available for accounts integrated with BigCommerce, Shopify, or Squarespace.*
* **Cart Variant IDs:** Target visitors based on whether or not certain product Variant IDs have been identified in their cart. *Available for accounts integrated with Shopify or BigCommerce.* *For BigCommerce stores, Privy does not sync the product catalog, so you'll need to enter the numeric Variant ID manually.*
* **Order Count:** Target contacts based on the number of orders they have placed with you. *Available for accounts integrated with Shopify.*
* **Display Seen:** Target visitors based on the displays that they have or have not seen.
* **Display Seen (this session):** Target visitors based on the displays they have or have not seen in this session. *A session is a group of interactions with your website within a given time frame. It expires after 30 minutes of inactivity.*
* **Display Signed Up:** Target visitors based on which displays they have or have not signed up for.
* **Display Signed Up (this session):** Target visitors based on the displays they have or have not signed up for in this session. *A session is a group of interactions with your website within a given time frame. It expires after 30 minutes of inactivity.*
* **Current URL:** Target visitors based on the URL that the visitor is currently on.
* **Day of week:** Target visitors based on the day of their visit.
* **Device category:** Target visitors based on whether they are accessing your site on a Desktop or Mobile device. *Tablets are considered part of the mobile device category.*
* **Initial traffic type:** Target visitors based on the channel they used to reach your site for the first time (e.g., direct, paid, social, etc.). *A visitor's channel is determined by the UTM parameter(s) included in the link that led them to your site.*
* **Initial URL (all time):** Target visitors based on the URL of the first page that they landed on when first visiting your site.
* **Initial URL (this session):** Target visitors based on the URL of the first page that they landed on when visiting your site this session. *A session expires after 30 minutes of inactivity.*
* **Pageviews (all time):** Target visitors based on the total number of pageviews across all of their tracked sessions.
* **Pageviews (this session):** Target visitors based on the total number of pageviews across the current tracked session.
* **Referring URL:** Target visitors based on the page they were on immediately before viewing the current page. *This URL could be from one of your site pages or an external page.*
* **Sessions Count:** Target visitors based on the number of unique times they've visited your website.
* **Time of day:** Target visitors based on the time of their visit.
* **Traffic type:** Target visitors based on the channel they used to reach your site (e.g., Direct, Paid, Social, etc.). A visitor's channel is determined by the UTM parameter(s) included in the link that led them to your site.
* **Custom JavaScript:** This allows you to create your own targeting rules using JavaScript. *This option is only recommended for advanced users and outside Privy Support's scope.*
* **User identity:** Targets visitors based on whether they are known or unknown.
* A "Known" visitor has submitted their information via a display or store checkout, been tagged with a tracking cookie, and become a contact.
* An "Unknown" visitor has not provided their information and remains unidentified. They may or may not be associated with an anonymous tracking cookie.
When adding multiple targeting conditions, you can use **AND** / **OR** logic to narrow down your audience and specify whether a visitor must **Match All** conditions (strict) or can **Match Any** condition (less strict). See the example below:
You have the option to choose one or more of the following **trigger** settings:
* Time on Page
* Show on scroll
* Show on exit intent
If you have more than one trigger setting selected, then whichever event happens first will cause the display to appear.
If you have no trigger settings selected, your display will not appear automatically for your audience. In this case, we recommend using a tab so visitors can manually trigger your display.
You have the option to choose one or more of the following **visibility** settings:
* Limit display appearance
* Automatically end the display after X signups
Limiting the display appearance will prevent the display from triggering again for a visitor until the specified time has passed. *Our default is always set to 1 day.*
Unchecking "Limit display appearance" means there will be **no limit** to how often a display will trigger in a session for your audience.
### Audience Targeting
Privy allows you to target displays by Customer Attributes, Shopping Activity, Website Behavior, and more. You can explore all available properties in depth below:
* **Country:** Target visitors based on the country reported by the visitor's IP address.
* **Custom Fields:** Target known contacts based on their Custom Field values, which can be provided via an import or by signing up for a display. Learn more about Custom Fields.
* **Language:** Target visitors based on the default language set in their browser. The values for this condition are language codes following the [BCP 47](https://www.techonthenet.com/js/language_tags.php) standard and written without the region subtag —for example, en for English, fr for French, or es for Spanish.
* **Postal Code:** Target visitors based on the postal code detected from their IP address. Enter each exact postal code on its own line, without country prefixes. For country-specific targeting, such as Norway, add a separate **Country** condition.
* **Region:** Target contacts based on their geographic region. This condition currently supports states from the United States, counties from the United Kingdom, provinces from Canada, and states/territories from Australia.
* **Cart Product IDs:** Target visitors based on whether or not specific Product ID(s) have been identified in their cart. *Available for accounts integrated with Shopify or BigCommerce.* *For BigCommerce stores, Privy does not sync the product catalog, so you'll need to enter the numeric Product ID manually.*
* **Cart Value:** Target visitors based on the current value in their cart. *Available for accounts integrated with BigCommerce, Shopify, or Squarespace.*
* **Cart Variant IDs:** Target visitors based on whether or not certain product Variant IDs have been identified in their cart. *Available for accounts integrated with Shopify or BigCommerce.* *For BigCommerce stores, Privy does not sync the product catalog, so you'll need to enter the numeric Variant ID manually.*
* **Order Count:** Target contacts based on the number of orders they have placed with you. *Available for accounts integrated with Shopify.*
* **Display Seen:** Target visitors based on the displays that they have or have not seen.
* **Display Seen (this session):** Target visitors based on the displays they have or have not seen in this session. *A session is a group of interactions with your website within a given time frame. It expires after 30 minutes of inactivity.*
* **Display Signed Up:** Target visitors based on which displays they have or have not signed up for.
* **Display Signed Up (this session):** Target visitors based on the displays they have or have not signed up for in this session. *A session is a group of interactions with your website within a given time frame. It expires after 30 minutes of inactivity.*
* **Current URL:** Target visitors based on the URL that the visitor is currently on.
* **Day of week:** Target visitors based on the day of their visit.
* **Device category:** Target visitors based on whether they are accessing your site on a Desktop or Mobile device. *Tablets are considered part of the mobile device category.*
* **Initial traffic type:** Target visitors based on the channel they used to reach your site for the first time (e.g., direct, paid, social, etc.). *A visitor's channel is determined by the UTM parameter(s) included in the link that led them to your site.*
* **Initial URL (all time):** Target visitors based on the URL of the first page that they landed on when first visiting your site.
* **Initial URL (this session):** Target visitors based on the URL of the first page that they landed on when visiting your site this session. *A session expires after 30 minutes of inactivity.*
* **Pageviews (all time):** Target visitors based on the total number of pageviews across all of their tracked sessions.
* **Pageviews (this session):** Target visitors based on the total number of pageviews across the current tracked session.
* **Referring URL:** Target visitors based on the page they were on immediately before viewing the current page. *This URL could be from one of your site pages or an external page.*
* **Sessions Count:** Target visitors based on the number of unique times they've visited your website.
* **Time of day:** Target visitors based on the time of their visit.
* **Traffic type:** Target visitors based on the channel they used to reach your site (e.g., Direct, Paid, Social, etc.). A visitor's channel is determined by the UTM parameter(s) included in the link that led them to your site.
* **Custom JavaScript:** This allows you to create your own targeting rules using JavaScript. *This option is only recommended for advanced users and outside Privy Support's scope.*
* **User identity:** Targets visitors based on whether they are known or unknown.
* A "Known" visitor has submitted their information via a display or store checkout, been tagged with a tracking cookie, and become a contact.
* An "Unknown" visitor has not provided their information and remains unidentified. They may or may not be associated with an anonymous tracking cookie.
When adding multiple targeting conditions, you can use **AND** / **OR** logic to narrow down your audience and specify whether a visitor must **Match All** conditions (strict) or can **Match Any** condition (less strict). See the example below:
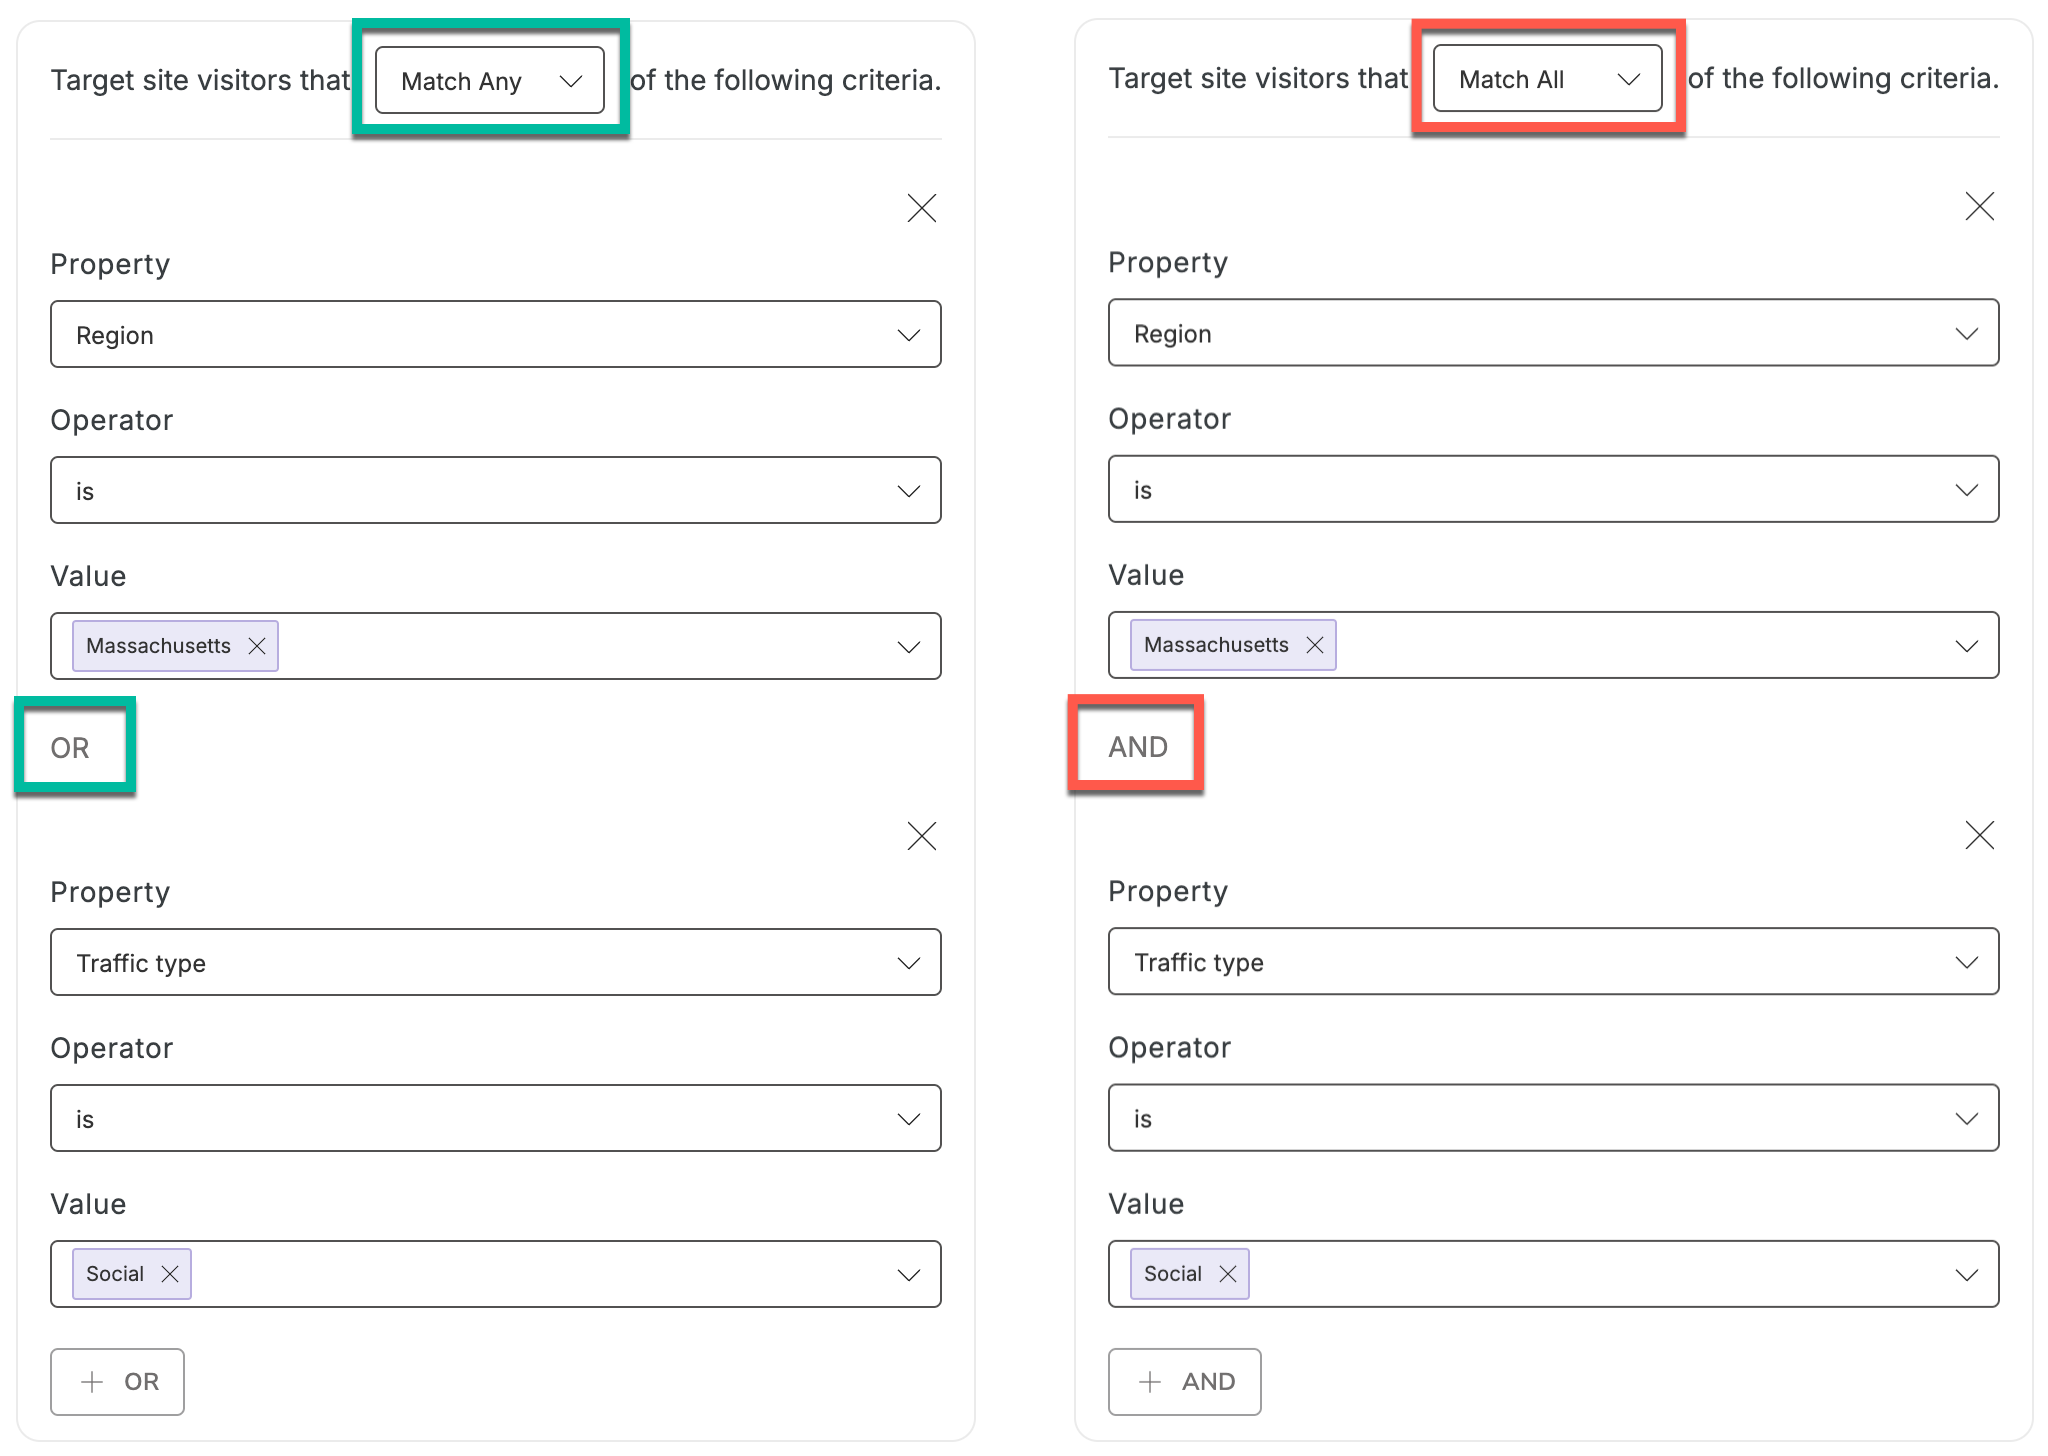 On the left, you'll see that we're using **Match Any** logic, so visitors who either live in Massachusetts OR came to the site from a social channel will see the display. On the right, you'll see that we're using **Match All** logic which means visitors must live in Massachusetts AND come to the site from a social channel to see the display.
If you remove all Audience Targeting, your display will be visible to everyone on your site.
### Scheduling
On the left, you'll see that we're using **Match Any** logic, so visitors who either live in Massachusetts OR came to the site from a social channel will see the display. On the right, you'll see that we're using **Match All** logic which means visitors must live in Massachusetts AND come to the site from a social channel to see the display.
If you remove all Audience Targeting, your display will be visible to everyone on your site.
### Scheduling
 You have two options when configuring the start and end dates of your display:
* **Ongoing:** As soon as you launch your display, it will be continuously active until you disable it.
* **Custom Dates:** Schedule your display to start and end automatically on a fixed schedule.
### Coupon
You have two options when configuring the start and end dates of your display:
* **Ongoing:** As soon as you launch your display, it will be continuously active until you disable it.
* **Custom Dates:** Schedule your display to start and end automatically on a fixed schedule.
### Coupon
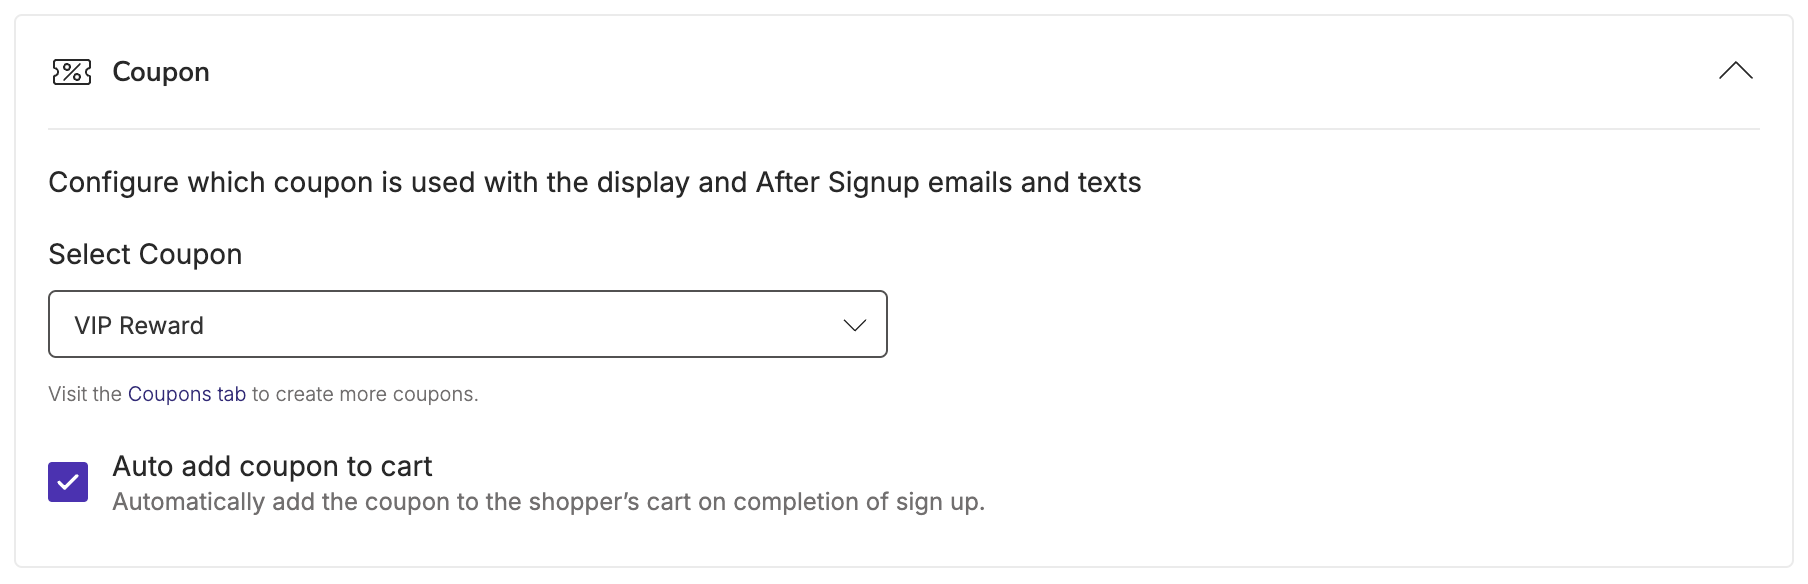 Attach a Coupon to your display so that it appears anywhere you are using the `{{ coupon.code }}` variable, such as your Thank You Page and After Sign Up Emails + Texts.
Select whether or not you'd like your Coupon to automatically apply to cart after they complete their sign up.
Your Coupon must be created in Privy in order to be attached to your display. [Learn more about creating and managing Coupons in Privy.](https://help.privy.com/docs/learn/content/coupon-codes)
## Advanced Settings
To expand and edit your display's advanced settings, click **Show Advanced Settings** at the bottom left of your screen.
### Sign Up Rules
Attach a Coupon to your display so that it appears anywhere you are using the `{{ coupon.code }}` variable, such as your Thank You Page and After Sign Up Emails + Texts.
Select whether or not you'd like your Coupon to automatically apply to cart after they complete their sign up.
Your Coupon must be created in Privy in order to be attached to your display. [Learn more about creating and managing Coupons in Privy.](https://help.privy.com/docs/learn/content/coupon-codes)
## Advanced Settings
To expand and edit your display's advanced settings, click **Show Advanced Settings** at the bottom left of your screen.
### Sign Up Rules
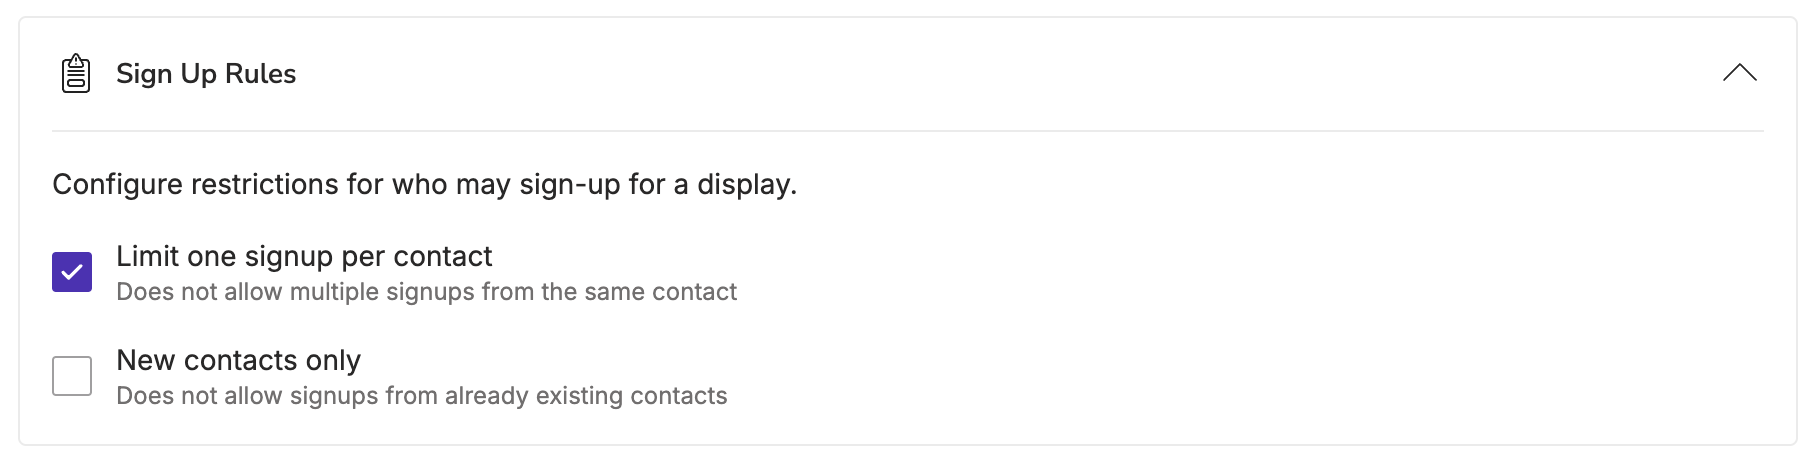 You can select up to two options for restricting who may sign up for your display:
* **Limit 1 sign up per contact:** This prevents the same email address from signing up more than once on the same exact display. *This is recommended and enabled on every Privy template by default.*
* **New contacts only:** This prevents email addresses that are already on your list from being able to submit a new sign up.
If a contact is restricted from signing up due to the conditions above, they will see an error message letting them know that they have already signed up.
### Signup Tagging
Use the **Signup Tagging** section to automatically apply one or more [Privy Tags](https://help.privy.com/docs/learn/contact-management/tag-contacts) to a contact when they sign up through this display.
* Open the **Signup Tagging** dropdown in your display's settings.
* Select existing tags, or type to create a new one.
Tags are applied at the moment of signup and become available everywhere tags are used — contact filtering, segmentation, and tag-based [Flow triggers](https://help.privy.com/docs/learn/contact-management/tag-contacts#trigger-flows-from-tag-changes).
### Email Opt-In
You can select up to two options for restricting who may sign up for your display:
* **Limit 1 sign up per contact:** This prevents the same email address from signing up more than once on the same exact display. *This is recommended and enabled on every Privy template by default.*
* **New contacts only:** This prevents email addresses that are already on your list from being able to submit a new sign up.
If a contact is restricted from signing up due to the conditions above, they will see an error message letting them know that they have already signed up.
### Signup Tagging
Use the **Signup Tagging** section to automatically apply one or more [Privy Tags](https://help.privy.com/docs/learn/contact-management/tag-contacts) to a contact when they sign up through this display.
* Open the **Signup Tagging** dropdown in your display's settings.
* Select existing tags, or type to create a new one.
Tags are applied at the moment of signup and become available everywhere tags are used — contact filtering, segmentation, and tag-based [Flow triggers](https://help.privy.com/docs/learn/contact-management/tag-contacts#trigger-flows-from-tag-changes).
### Email Opt-In
 Choose between **Single Opt-In** and **Double Opt-In** for email sign ups on your display. *Single Opt-In is the default setting for each Privy template.* Choosing Double Opt-In is encouraged for building a high quality, engaged list; it requires new sign ups to confirm their subscription in their inbox. [Learn more.](https://help.privy.com/docs/learn/contact-management/email-opt-in)
### SMS Opt-In
If your display collects phone numbers, the **SMS Opt-In** card lets you choose how contacts confirm SMS consent: **Double Opt-In** (the contact replies 'Y' to a confirmation text before becoming textable) or **Single Opt-In** (the contact becomes textable immediately on submission and automatically receives a confirmation text). The preview updates as you toggle to show the message your contacts will receive. New displays default to Double Opt-In. [Learn more about SMS Opt-In Methods.](https://help.privy.com/docs/learn/contact-management/sms-opt-in)
### Sync Integrations
Choose between **Single Opt-In** and **Double Opt-In** for email sign ups on your display. *Single Opt-In is the default setting for each Privy template.* Choosing Double Opt-In is encouraged for building a high quality, engaged list; it requires new sign ups to confirm their subscription in their inbox. [Learn more.](https://help.privy.com/docs/learn/contact-management/email-opt-in)
### SMS Opt-In
If your display collects phone numbers, the **SMS Opt-In** card lets you choose how contacts confirm SMS consent: **Double Opt-In** (the contact replies 'Y' to a confirmation text before becoming textable) or **Single Opt-In** (the contact becomes textable immediately on submission and automatically receives a confirmation text). The preview updates as you toggle to show the message your contacts will receive. New displays default to Double Opt-In. [Learn more about SMS Opt-In Methods.](https://help.privy.com/docs/learn/contact-management/sms-opt-in)
### Sync Integrations
 If you are using an external email service provider and/or need to sync your sign ups to one of your Linked Accounts, make sure you add all necessary sync rules to your display(s) here. [Learn more about our supported Integrations.](https://help.privy.com/docs/learn/integrations/overview-integrations)
### Profile Attributes
If you are using an external email service provider and/or need to sync your sign ups to one of your Linked Accounts, make sure you add all necessary sync rules to your display(s) here. [Learn more about our supported Integrations.](https://help.privy.com/docs/learn/integrations/overview-integrations)
### Profile Attributes
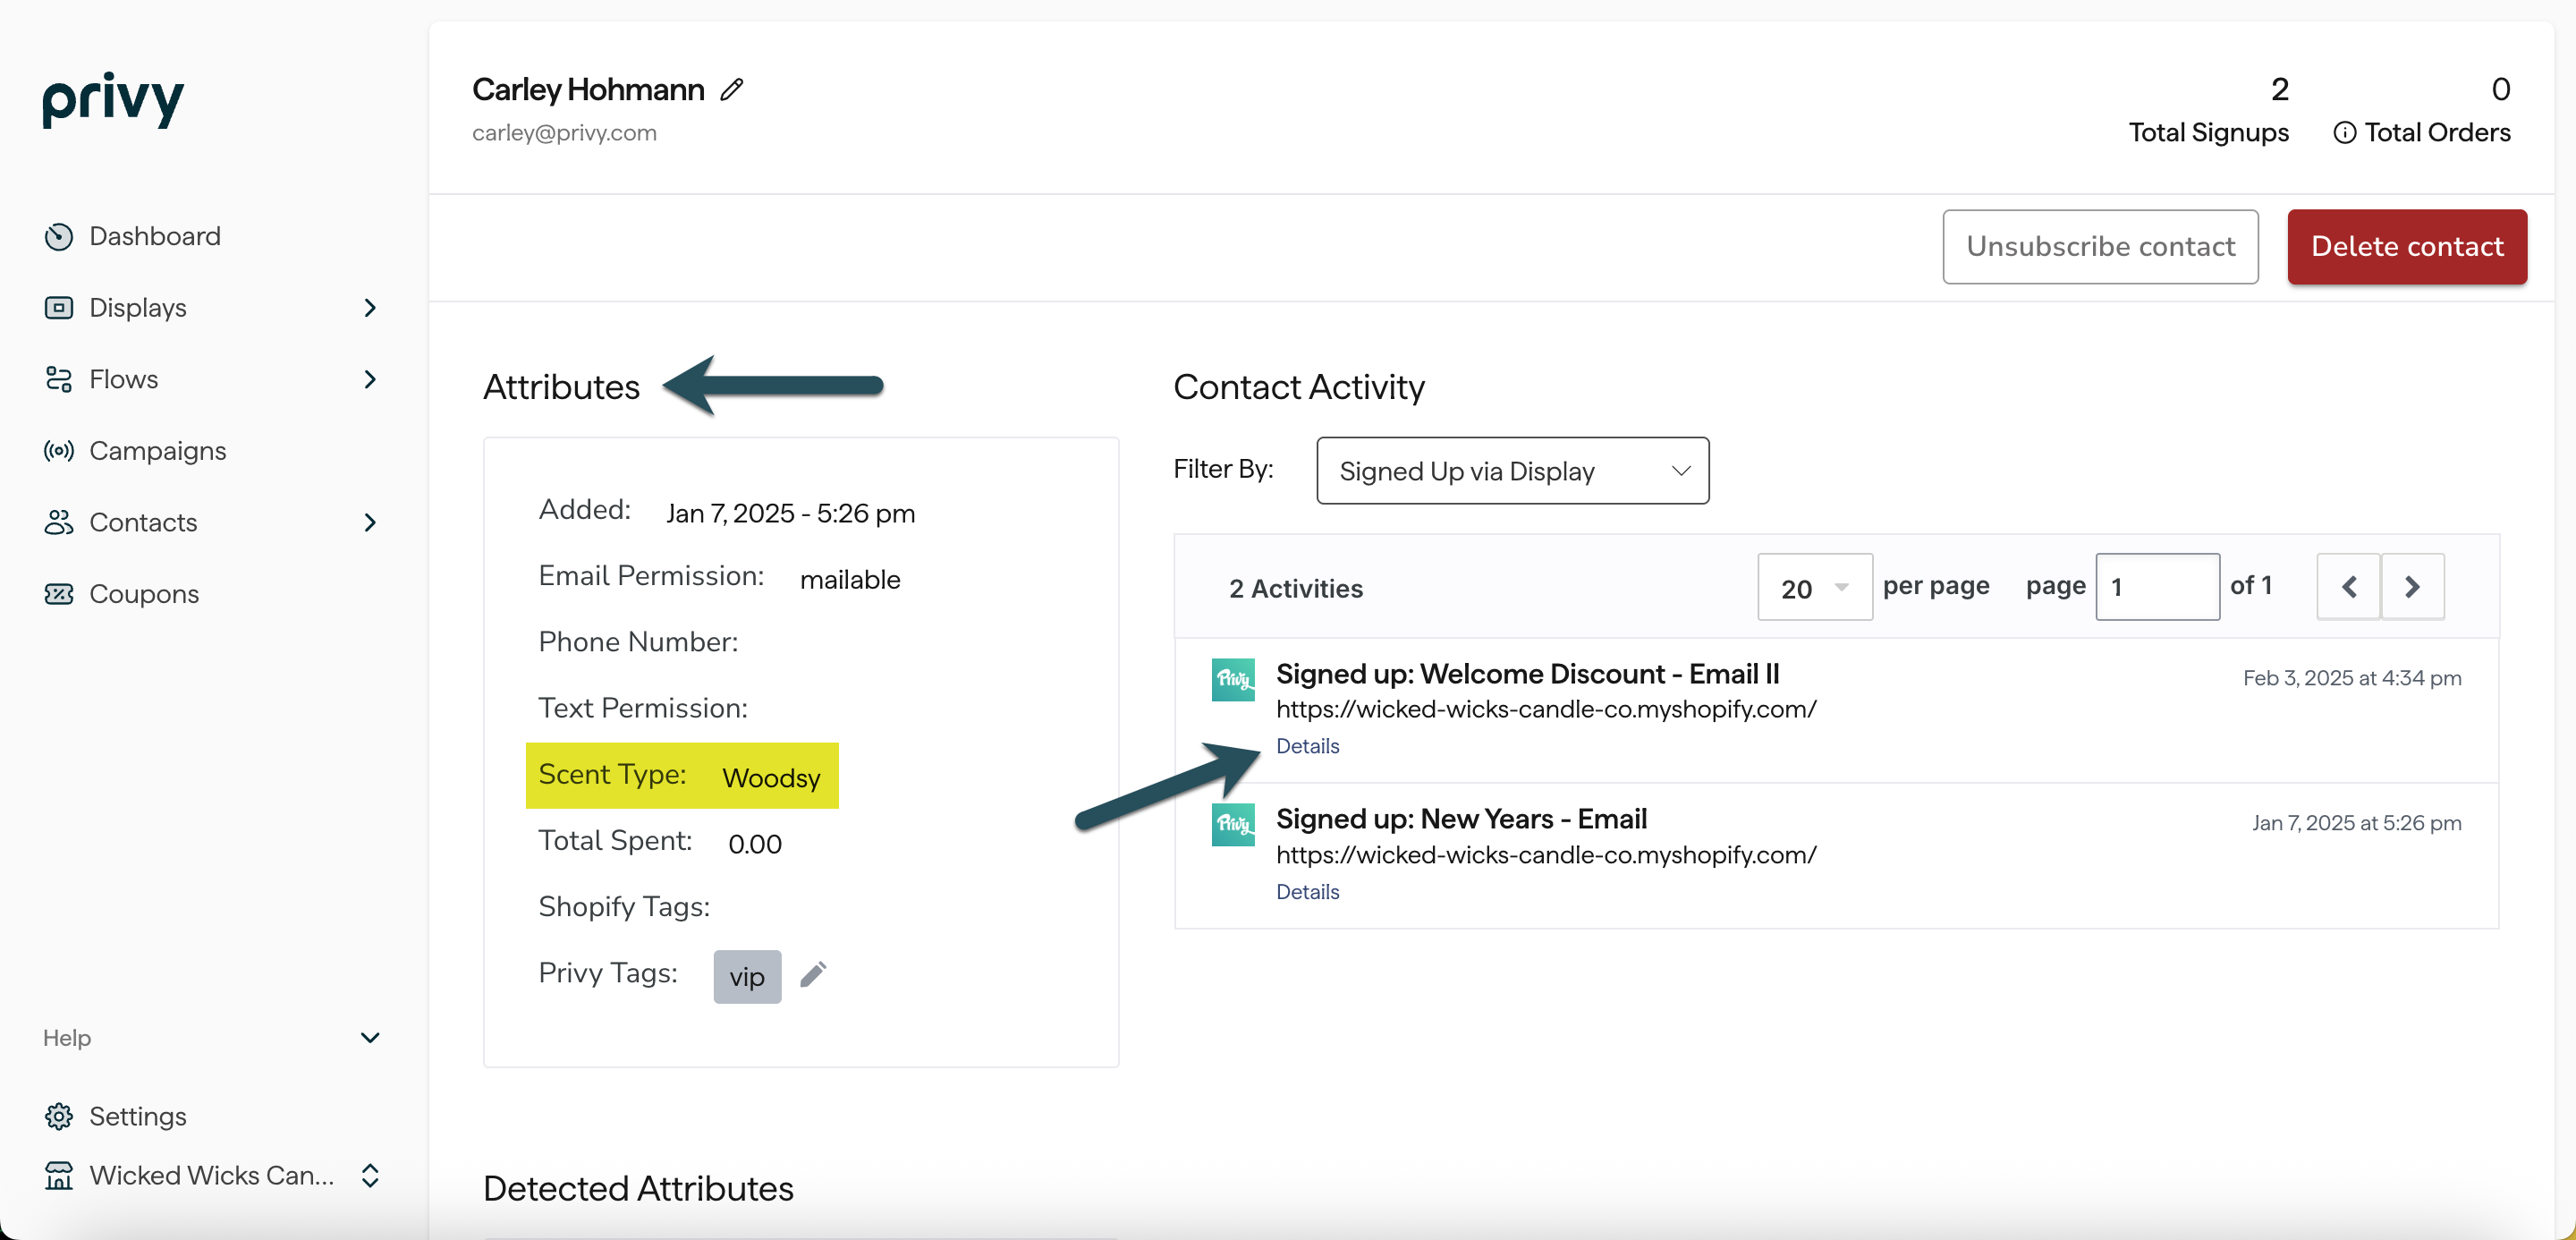
 Profile Attributes are datapoints that are automatically detected by Privy upon sign up. This data may include the page they were on when they signed up for a display, browser information, visit history, and approximate location.
The following Profile Attributes are available in Privy today:
The coupon code the visitor received upon signing up.
The number of browser sessions this user has had on your site. *A session ends after 30 minutes of inactivity.*
The number of pages this user has viewed across all known sessions on your site.
The number of pages on your site this user has viewed this session.
The most recent URL the user was seen on while interacting with a display.
The timestamp of when that contact registered.
The UTM parameters (if present) of the URL where the contact signed up on a Privy form.
Use this option to set a custom field which can be used for filtering or segmentation in the future, or mapped to the Linked Account(s) that you're syncing sign ups to.
**Where can I find Profile Attributes after I've collected them?**
Detected attributes appear on [individual contact records](https://help.privy.com/docs/learn/contact-management/view-and-filter-contacts#viewing-individual-contacts), in [contact exports to CSV](https://help.privy.com/docs/learn/contact-management/export-contacts#export-contacts-to-csv), and in your Linked Account's data (if you are syncing sign ups to a third party).
Profile Attributes are datapoints that are automatically detected by Privy upon sign up. This data may include the page they were on when they signed up for a display, browser information, visit history, and approximate location.
The following Profile Attributes are available in Privy today:
The coupon code the visitor received upon signing up.
The number of browser sessions this user has had on your site. *A session ends after 30 minutes of inactivity.*
The number of pages this user has viewed across all known sessions on your site.
The number of pages on your site this user has viewed this session.
The most recent URL the user was seen on while interacting with a display.
The timestamp of when that contact registered.
The UTM parameters (if present) of the URL where the contact signed up on a Privy form.
Use this option to set a custom field which can be used for filtering or segmentation in the future, or mapped to the Linked Account(s) that you're syncing sign ups to.
**Where can I find Profile Attributes after I've collected them?**
Detected attributes appear on [individual contact records](https://help.privy.com/docs/learn/contact-management/view-and-filter-contacts#viewing-individual-contacts), in [contact exports to CSV](https://help.privy.com/docs/learn/contact-management/export-contacts#export-contacts-to-csv), and in your Linked Account's data (if you are syncing sign ups to a third party).